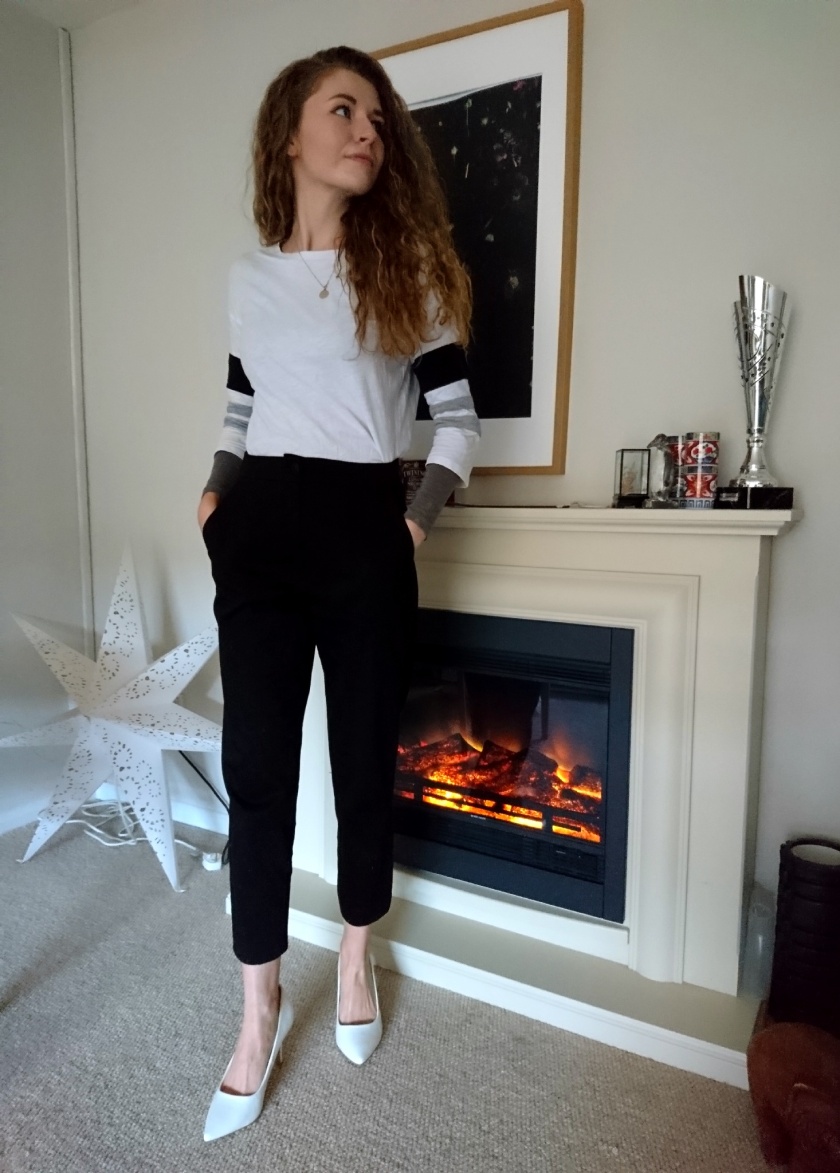
I thought I’d get started early on the Autumn and Winter sewing, helped by my purchase of some fabric on Instagram from a sewist who was destashing! I bought three pieces, two of which were perfect for sweatshirts of some description. I knew immediately that I’d be making another LB Pullover from Paper Theory with the one piece, a mustard French Terry with a white tulip print. I have many of these tops now, it’s so quick to make, can be sewn in both woven or knit fabrics and fits over just about any tee or blouse I have. It’s perfect to go over the Olya Shirt too!
There was just one metre though, which meant I could either have short, 7/8th length sleeves which would leave my wrists chilly, or make a plan with piecing and have warm arms! In the end, warmth and comfort won out and I made a plan to lengthen the sleeves. I cut the full length I was able with the fabric available, and just cut what was left + hem allowance out of left over bits. It’s worked to make it look like I have a cuff – but if I’d had just a smidge more fabric, I’d have cut that section so that it was doubled, and had a real cuff that I could have folded back if I’d wanted to.
However – I did not have enough and I am very happy with my new top, already worn on many, many occasions! I never thought I’d be wearing mustard, never mind a fabric with a print like this, but I like it. It’s cheerful and bright and works with my colouring despite my initial misgivings! (I thought I would make the top for a daughter – not me…)
The second top is the Fibremood Vera, made from the magazine bought earlier this year as an experiment. I acutally liked a couple of the patterns, but this is the first one I’ve managed to get made up. The fabric is a grey sweatshirt fabric, with tiny flecks of colour in it. It’s warm and snuggly and just the right sort of boxy. The sleeves are 3/4 in length, next time I’ll lengthen them. They’re also fairly wide – wider than expected.
The neck on the Vera is interesting, part of why I decided to make this pattern up. It is faced so makes it thicker than the rest of the top, but it would be interesting to use up leftovers or even pipe that joining seam. One thing I’d change next time with the neckline is to lower the front a bit. You can see in the photos that it’s too high in the front for me, and it gets more annoying as the day goes on. Another change would be to shorten the top slightly, only about the depth of the hem.
I made the Large, based on bust measurements, and for this version did not make an FBA. I might do one next time, but it doesn’t need much. The pattern was easy to trace and the instructions are interesting – they’re all diagrams! You can go online and get more detail if you think you need it, but these were ok for me.
Style Arc Annika top
One more stash bust – this time a Sewing Leftovers project. I’d made a Uvita top from some lovely soft stripey jersey and had about half a metre left. I decided to make the Annika top from Style Arc. I bought this paper pattern aaaaages ago, on one of their Etsy sales. It’s one of the mulit-size patterns, they only way I’ll buy a Style Arc pattern. The top has a jersey top half and woven bottom half, sleeves included. So, I used the stripey blue an white jersey for the top part and some blue poly georgette that has been in the stash for a very long time for the bottom part.
I shortened the jersey section because I didn’t like where the join hit me, and removed the shirt hem shape too. This made the top too long on me and just didn’t work. I like this top though, might need a small FBA again for another time, but it’s perfectly wearable like this. Style Arc instructions are brief but you don’t need too much detail to make this pattern. I made the 14, but I think the 12 would fit better at the neck and shoulders, so maybe a FBA on the 12 would be a good idea for next time!
That’s it for stashbusting so far, I’m glad I was able to use up these fabrics and make something useful!
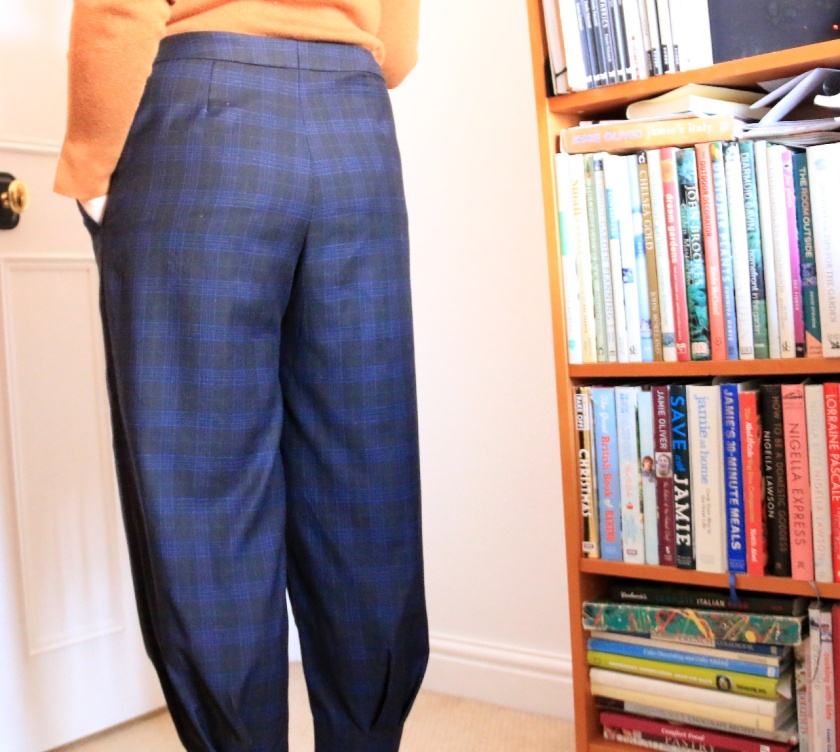
A year or two ago, I made a pair of Stride pants from the Merchant and Mills Workbook. I’d made the largest size and shortened them a bit, but I cannot remember just how much right now. The pattern was fine and instructions did the job, but I never liked the finished trousers. I was really disappointed because I’d used a beautiful piece of black and blue plaid wool from Fabworks. I was annoyed that such a lovely piece of fabric was now a very unliked pair of trousers. I never even took photos of those pants!
So why didn’t I like them? They were too wide, too floppy and the pleated front with waistband on the natural waist just didn’t suit me. And I love wide, floppy trousers!! So I wore them around the house for the first year, last winter I didn’t wear them at all, and this winter I decided I’d put them in the adjust or remake pile. I had 6 pairs of wool trousers to make two sizes smaller before I got to these, and at that point I had no ideas of how to make these better.
Then, last weekend, when I was clearing the piles to make way for a visitor, I had a brainwave after dropping a piece of fabric. It was the toile for Burda trousers 107 08/2019. I’d traced the 44 – after making the 42 in the last pair of Burda trousers and finding them to be just a little on the small side! But the toile for these was way too big! So I needed to go down a size, definitely, and shorten the leg by 3-4cm to get the finished cuff to sit in the right place (to look the same as the model in the magazine). The adjustments to the pattern were already made & I thought I had the right fabric to make a proper pair.
But – I was sort of reluctant to cut that fabric – see previous post! The pattern can be made in fabrics with or without stretch, and the one in the magazine is made in ponte (that’s a good idea for next time!) Back to that brainwave – could there be enough fabric in the Strides to be able to recut this pattern?? So I got cracking with the seam ripper, carefully unpicking all the seams, taking off the waistband and removing the zip. After a good press to flatten the hems and seam allowances, I pinned the two fronts and two backs together, making sure the plaid was lining up too. Then I took a deep breath and tried to get the new pattern pieces onto the existing trouser pieces.
Burda trousers 107 08/2019
The back fitted perfectly, the front needed the grown-on zip facing to be removed, so I cut that as a seperate piece and attached it later. Pockets and facings were going to be tricky, but, here’s the good part. I had saved all the left-over bits of fabric from the original cutting out in the wool box! Woohoo for scrap-stashing! So, hip yoke pockets, waistbands, cuffs and the fly facing were cut from the left-overs, and a scrap of lining sorted the pocket bags. I also managed to line up the plaid, high five! I reused the zip and found a good button in the button box, I bought nothing to make these new trousers.
Hip yoke pockets are lined with a scrap of lining fabric.
The making went well, instructions didn’t need much altering. I usually insert the fly zip immediately after making the pockets up, it’s so much better to do without all the extra legs in the way. The other thing I changed was to sew the pleats in the trouser cuffs first. Darts and pleats first, whether at the waistline or at the hem! I just knew that if I left it to the end when the instructions finally have you do them, I’d have lost more than half of the tailor’s tacks, and as both the leg seams are sewn up, you have more fabric hanging around than you’d really want.
Centre back seam in the waistband to help with alterations (if required) later on
I rather like these! I’m keen to make a pair in ponte now, I think they’d be so comfy. They’re admittedly a little loose on the waist still, but I have a secret trick to fix that quickly. I don’t cut back waistbands on the fold, I add a centre back seam. Then, when sewing the crotch seam, I leave the last 15cm of the back open. Then the waistbands are added, in halves (one front and one back). Add the waistband facings, press, understitch, etc and then sew that back seam, all in one go! This means that if you need to take in, or let out, the back seam, there’s very little to have to unpick, and it’s so, so easy to adjust!! Men’s trousers are sewn this way, so why not ours??
Anyway, I’m off to enjoy wearing this gorgeous fabric now, and I might have to find a good colour ponte for another pair, some secret tracksuit pants!
Apologies for not noticing when taking the photos that the camera had decided that the teak chest of drawers was far more interesting to focus on than my trousers!!
A little sewing procrastination happened after that mad “help me” post from a couple of weeks ago. In order for me to get all my thoughts in order and ducks in a row, I decided a quick detour would be a good idea. I had a piece of red and white viscose crepe left over from a blouse I’d made in January for the Burdachallege 2018. I also had a pattern I’d traced 106 from April 2013 Burda, it’s only got 4 pieces, quick and easy! I’d rather liked the look in the magazine when it first came out, but never really got round to making it.
Top 106 April 2013
This year, while I was tracing a pair of shorts from the same magazine for Daughter No2, I remembered this top and traced that too. A quick toile revealed it was too long for me (5cm) but didn’t need anything else, no FBA! Yippee! Now one thing to remember, if I were to go by measurements, the 44 would not fit me. In order for the top to look on my the way it does on the model, I’d need to go up 2-3 sizes. But there’s no way I’d want to wear it like that! All I want is a loose-fitting top with a bit of ease – not a tent! So bear that in mind when judging how tops look on me, compared to someone who’d normally fit into any size bracket.
The pattern pieces fitted on the remains of the fabric easily, neck facings were interfaced with fine sheer fusible from Gill Arnold. You could, if you preferred, use self-bias binding for the neck edges instead of the facings. The style is a loose fitting top with pleats at the front neckline with slight drop shoulder and no sleeves. The pleats were basted in place and steamed to hold the shape until I sewed on the facing.
I used French seams throughout and double turned the hem edges on the sleeve openings and the hem of the garment. It’s turned out really nicely and I like that I have another red top for the summer! I have worn the original red top from January loads of times, it gets compliments all the time. So now I have a summer one! Thankfully the shape is great for the current weather, and now I want another. I’m sure I have some small pieces of fabric lurking in the stash that I could use in this pattern, but first….
I must get on with reducing the piles of fabric and pagazines/patterns on the table in my sewing room and covering the bed in the guest room! I can say that I have made one of the items I rambled about last time, that inky blue linen/cupro blend. And it’s made fabulous cropped trousers! Will be showing those off soon…
Making a good start on that long list of items for Daughter No 2, she’d identified a couple of pairs of trousers she really really wanted, and had allocated fabric from the stash! The tracing was done and when she came home for a week, I decided to get making, but with conditions…
She helped me in my allotment in the mornings (vitamin D and excercise) and then in the afternoon, we would sew together. She’d also made a pile of summer clothes that came out of the loft that needed attention. So we had our week’s worth of work laid out!
Burda trousers 113 08/2017
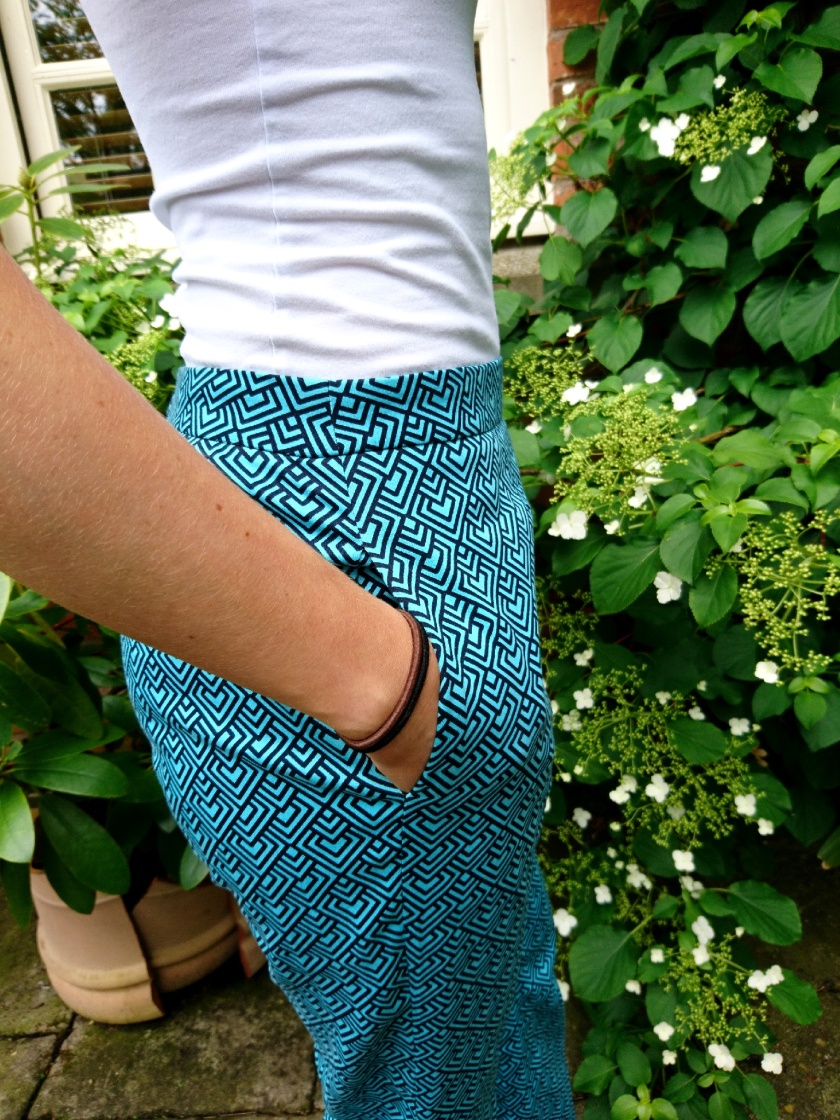
The first pair of trousers is 113 from Burda 08/2017. The fabric chosen to make them up came from ( I think) Ditto Fabrics, a good few years ago now. Daughter No 2 is slightly pear shaped, narrow waist and broader hips. There is usually a 2 size difference, so I traced the equivalent of the 38, going by her hip easurement. It’s a petite pattern, so I lengthened it: 1cm in the crotch depth, 1.5cm between the hip and knee and another 2cm between the knee and the hem. That should make it the right length for an “average” height person. Then I toiled and made the fitting adjustments on her to get the waist perfect. This was especially needed as the waistband doesn’t sit on the natural waist. But one thing didn’t quite work out. The length!!! The photo in the magazine clearly shows the model’s ankles and bottom part of her leg below the hem of the trousers, that was not happening with ours! You would expect Burdastyle to photograph the petite garments on petite models, yes?? I think they have used their standard height tall people here, there’s no other way to get the length they have, because even on shortening the pattern again (except for the crotch depth adjustment), it still wasn’t as short as on the model in the picture. And at 1.76cm tall, you cannot call Daughter No2 “average” height…
In the end we kept the length as it was originally traced, and narrowed the waist to just below the size 34. I took a bit out of the centre back to accomodate her posture, scooped out the crotch line and changed the shape of the curve – also a posture adjustment, and took in the inside seam, front seam by 1cm and back seam by 2, all tapering back to normal by the knee. I also added pockets! You need pocketses, so I drew up a pattern for inseam pockets, nice deep ones that ones phone won’t fall out of…
Inseam pocketses for the win!
I really love the finished pants, the colour of the fabric is turquoise with very dark blue diamond shapes, it looks black, but it’s not! I like that Daughter No 2 is confident to change it up with different shoes, and tops. I hope they get lots of wear this summer! That was a May Burda Challenge project, but as it’s only been blogged now in June, I’m calling it for June instead!
I’ve got a large plastic tub full of pieces of fabric left over from all sorts of projects, all big enough for something, but not something for me. I’m always loathe to throw these bits out, or even to give them to the local school for the kids, because I know I can do something useful with them – eventually…
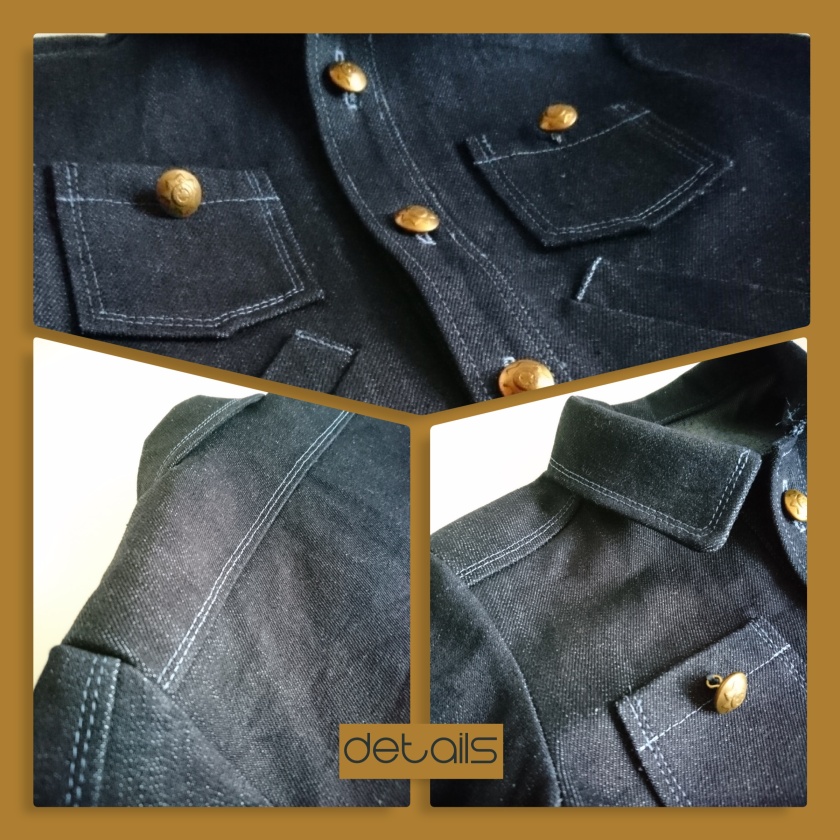
So this project is me using up one piece of that stored fabric. You’ll remember the Morgan Jeans I made last year, with a yummy, dark denim from Croft Mill Fabrics. There was a piece left over that wasn’t much good for anything except maybe a tote bag, and that’s what I had in mind for it for ages. But, going through the April issues of Burda looking for projects to make this month, I came across a cute kid’s denim jacket #134 04/2010. A friend of mine has a little boy who’s 5 this year – it would be perfect for him! (and I thought it could be kept for his little sister to wear when she’s big enough)
Kid’s Denim Jacket, Burda 134 April 2010
So I traced out the 6 year old size (110), and the pieces fit perfectly on what was left of my denim. Go! Go! GO! It was tricky to get the pins in, I’d forgotten that, and stiff to cut – oh dear, but I ignored the warning bells…
Lots of topstitching – I didn’t even try topstitch thread!
All in all, it’s a simple pattern to assemble, the instructions, while basic, are clear. The only problem I had with the whole thing is the size of those little pattern pieces and the stiffness of the fabric! I don’t mind admitting I swore a fair bit. And I have made a vow, never make a tiny denim jacket with fabric that stiff ever, ever again!!! It was really fiddly to turn the cuffs, the collar nearly killed my fingers (they got in the way of my pounding). The only good thing was that my old Bernina sailed through all those layers of thick denim with consumate ease.
Boy am I glad I’m only making one for two kids! I think it would be lovely in a softer twill too, even a nice linen/cotton blend. In order to reduce bulk around the welt pocket area, and to make it easier for my machine to get through layers, I cut the pocket pieces from another bit of left over fabric, black and white large check gingham cotton. I deliberately did not choose something “boy-like” so that it could be handed down and worn again. I like the idea of unizex clothing when it comes to items like jackets and coats. Makes sense, money wise. I remember as a kid, my mum bought me boys jeans that my brother got when I outgrew them, and my sister got them after that! If there weren’t holes in them, that is.
Gingham check cotton for the pocket bags
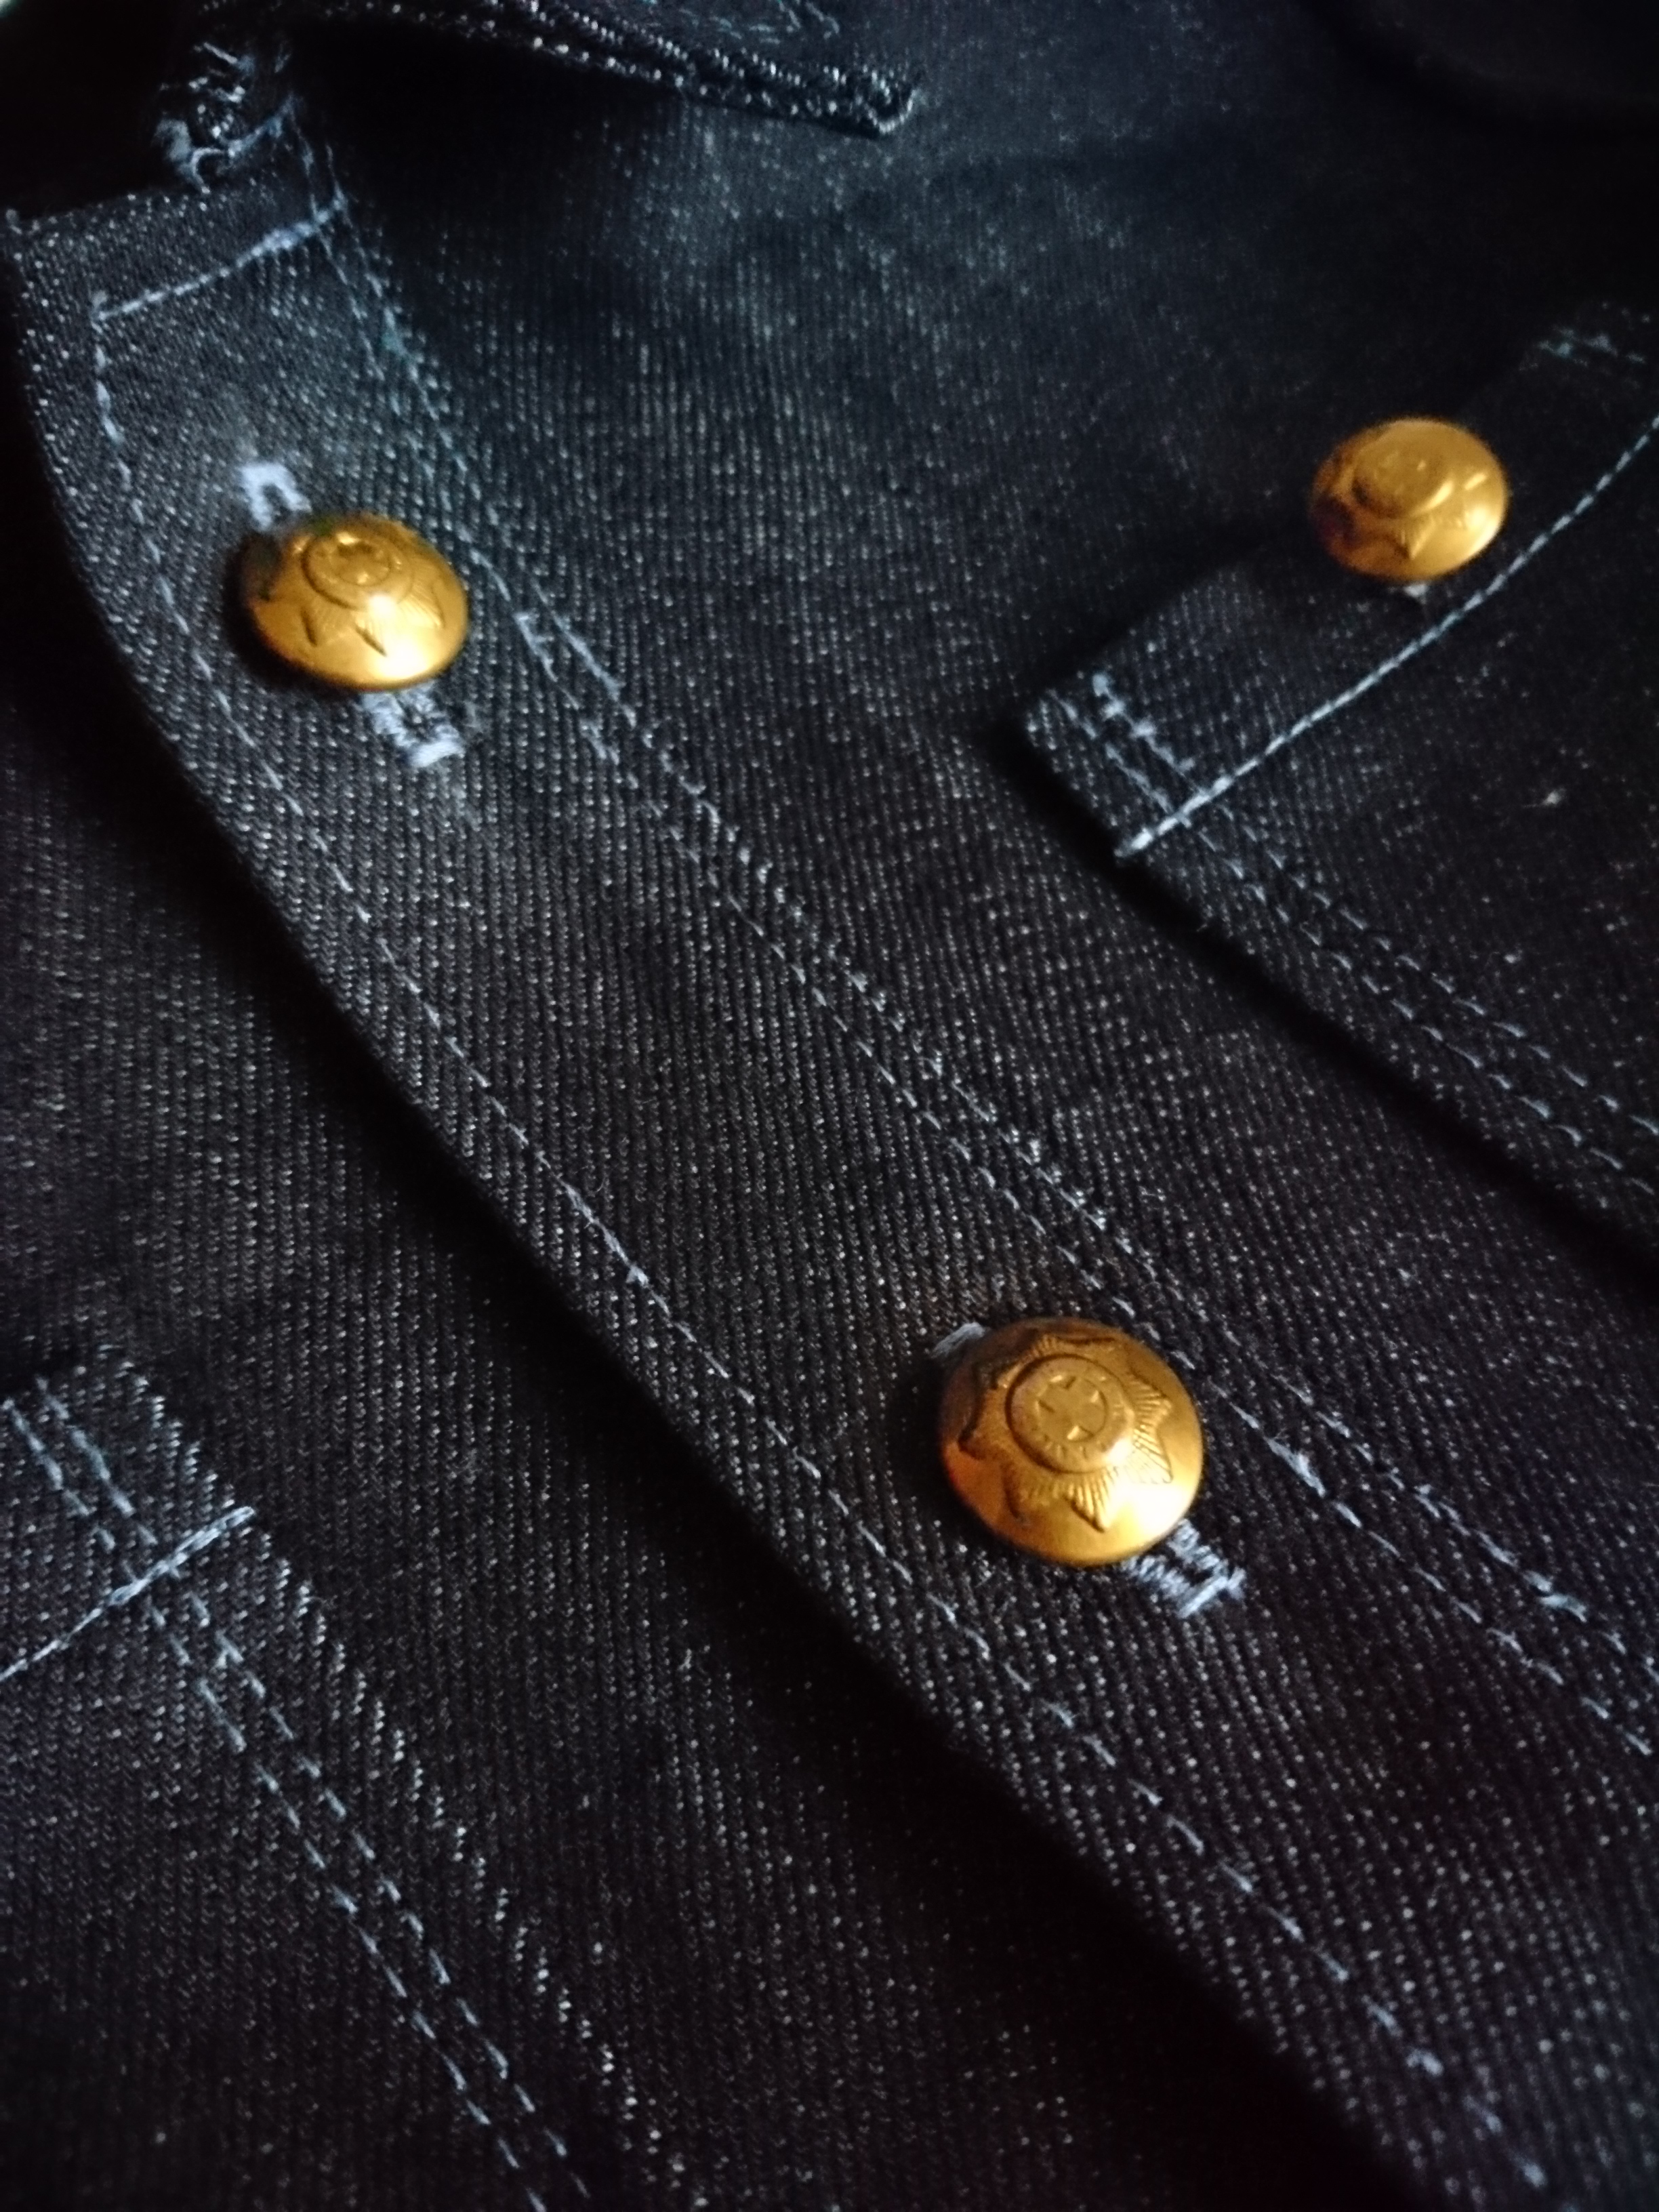
I didn’t want traditional jeans buttons, they can sometimes be stiff to use, and with this fabric it needed to be easier for little fingers, so I raided my vintage button box and dug out some military uniform buttons I’d got from the charity shop a year or so ago. The small ones were perfect! I’m really happy with how they look on the front of this jacket.
My long-list for April’s Burda Challenge sewing was fairly long, and I decided against just chopping it down randomly, rather by seeing what fabric I had and going that way. On that list were frequent referrences to “kid’s clothes” because the size range is right for my friend’s kids. This is the first of those projects to be made and there’ll be more! I need to get that fabric box emptied, and it’s nice to make clothes for kids, they’re usually much quicker and simpler than adult’s clothing.
Now I’m off to continue tracing the long list of patterns daughter no 2 would like made up for the summer – this summer! By the way, if you’d like to see her wishlist…
Here’s a pair of trousers that should have been made about a year and a half ago – at least! The fabric is black stretch cotton sateen, bought from Croft Mill Fabrics for Daughter No 1 for trousers. But she asked me to wait to make them, considering the weight of the fabric to be summer-worthy only, and it must have been Autumn when the fabric was purchased.
Trousers 123 06/2011
I’d always intended to make another pair of trousers 123 6/2011. I’ve lost count of how many times I’ve used this pattern – for both girls! It’s a petite pattern, so needs to be lengthened for Daughter No 2, but is pretty good for her sister. I shortened the waistband depth by 1.5cm this time though, she always complains it’s too high. I think it’s because she’s short-wasited that it “gets in the way”.
As we were going to visit over the Easter weekend, I figured it was time to get that fabric out of my stash and the “to do” off my list! She’s been living about 2 hours away for the last year, and that isn’t terribly convenient for sewing and fitting.
I made one other adjustment – the back waistband (which is supposed to be straight) has a dart folded into it, lining up with the centre of the two back darts on the trouser pieces. This is because the wasitband always gapes in this pattern, but the folding of a paper dart does the trick. I cut the 17 (34) and sewed it up. There are no contrasting fabrics in the pockets, zip guard or waistband, it was kept deliberately simple. I do think I could make the trouser legs narrower, she’s so slim that even the smallest size needs taking in!
She starts a new job in London this week, so I hope these pants will be getting loads of use! They’re perfect for dressing up or down and look great with heels and a nice pair of trainers. I was glad to be making for her again, it’s been a while. And secretly, I’m chuffed to bits that the old pattern adjustments still worked and I didn’t need to take the pants home again to tweak the fit!
So another pattern to tick off for the BurdaChallenge 2018, even though it’s not a March pattern, and more stashbusting, making room for new stuff! 🙂
My first little foray into making clothes with a Japanese inspiration went well, I’ve worn the gingham linen top a lot in the past few weeks and I really love it as much as the first one I made in January. I now have all three of the Japanese books I ordered, Clean and Natural and Kana’s Standard I & II. My first project is inspired by the Flared Top in the Clean & Natural book, and is based on a Burdastyle pattern I made 3 versions of last year.
Modified Burda top 124 5/15
Why use a Burda pattern instead of the pattern in the book? Because the book has patterns for Japanese sized and shaped ladies, which is not me. So I was always going to have to draft or alter something to make it work. You can put large, baggy clothing on slim people and they still look great, but those same proportions on someone a “little” larger don’t work. I certainly feel like I’m wearing a tent, which is precisely why I don’t use the plus sizes in the Burda patterns!! Too long and too wide!
So, here’s what I did to get my own version of the Flared Top. The original pattern has a yoke front and back that starts under the arm and scoops up and over the bustline, the sleeves are grown-on. The length of the top is 55cm, which is not too long. The flare though, is substantial. Lovely on a “skinny minny”. That yoke line and flare over the bust is not flatterning on someone with a larger bust. The yoke would have to sit much lower. I decided on using #124 05/2015 because (a) I’ve made three others, so it’ll be quick, (b) the fit was already good, (c) it had a yoke in a good position, and (d) I’d be able to add flare to just the lower front and back pieces quickly and easily, after straightening out the curved hem.
I added 2cm of flare to the hem on the front and back side seams of the lower pieces and divided the front and back into thirds. The first third from the centres became the line where more flare was added. I slashed and spread, adding 5cm at the hemline. This meant the front and back pieces were 12 cm wider than the original pieces. I figured this would be enough flare for me.
I did not toile…. I went straight in with the fabric, I had some lovely misty grey viscose in the stash, bought last year or the year before from Clothspot. It has that lovely drape and sheen that I love in a viscose. I used French seams throughout and double turned the hems. I omitted the keyhole opening of the original pattern and used bias for the neckline.
So, how did it work out? Pretty well, I think. I’m not putting this top into full rotation in the wardrobe until it warms up considerably! I think it’ll be lovely in the summer, the flare will help air to circulate! The colour is great and I think there’s just enough flare to give a nod to the Japanese pattern, with me still feeling comfortable in it. I will be making it a little shorter though, I recon 5cm should do it.
If you’re the right size and shape to make a version straight from the book, the diagrams are simple to follow and you don’t need to know Japanese to make anything. There is a great blog post here to help you understanding some of the terms you’d come across in these books. For another version of the top, from the original pattern, here’s Sew Busy Lizzy’s beautiful top.
I’m already planning my next projects from these books, and have tweaked my easy fitting bodice block and drafted a Kimono block to help to get me started. There are many patterns I want to try, I hope they all turn out as fabulous as they look in my head! 🙂 In the mean time, there’s still the Burda Challenge 2018 to get on with, and April is looking like it’s going to be full of sewing, although not that many patterns from this year’s issue have got me excited. There seem to be more in previous years, but we’ll get to that in another post, shall we?
We’re just recovering from the coldest February/March week ever (in my 20 years) in the UK, so what did I decide to make for my first project for March Burda Challenge? A coat. A thick cuddly fleecy top. NOPE – I made a pair of streth cotton satin cropped trousers. As you do.
I had a pretty long list of items I could have made this month, looking through 8 years of Burdas showed March to be overall a pretty good month. But getting realistic, I don’t have enough fabric (the right fabric) to make them all, never mind the time! And hangars – if I’m going to continue to make clothes like this I am going to need more hangars (and wardrobe space).
The first item on the now shorter list is a pattern I’ve made before, trousers 109 from March 2010. The last pair was made in a very similar fabric, so I didn’t expect to make any changes to the pattern. The fabric I chose from the stash came from Croft Mill Fabrics, about 2-3 years ago. It’s gorgeous damson/plum colour, and one that does not exist in any way shape or form in my current palette. But I love it, and with a grey or silver top, these will look fab. (BTW if anyone knows where I can get copper or rust coloured stretch cotton satin – shout!)
I used a small piece of scrap pink rose print Liberty lawn for the pocket linings to minimise bulk, re-used the zip from an old project, long discarded. Even the perfect coloured thread for topstitching was found buried in the thread box, this really was a stashbusting project!
Liberty lawn for my pockets
Sewing up was pretty easy, I overlocked all the pieces (yay for a new cutting blade!) and made a nice pile of purple fluff. Everything went swimmingly until I pinned the hem. These pants looked really short – even for cropped pants. So I tried them on and – oops, I think I may have been over zealous after making the last pair with the shortening… I had taken out 6cm in the leg length on the pattern, and maybe that’s the right amount, but on my legs it doesn’t look right – my calf is too wide there! So I let the hem down and I’ve made a false hem with some ribbon (from the stash again!). Much better – and I’ve re-adjusted the pattern accordingly!
On further investigation of the pattern, it turnes out the adjusments made were made after I’d sewn the last pair – which were supposed to be the cropped version! Oh dear, they most definitely were not cropped! So I need to find the happy medium between the two lengths. But I’m happy with these now, and the colour is really nice! I tested them out before committing to hem length with my elephant print silk top and the two went together surprisingly well. So I’m expecting these pants to fit into my spring/summer wardrobe fairly well.
Other items that made the short list for March are another pair of trousers, two tops and a spring coat! I was the lucky recipient last year of a lovely blue and white jacquard fabric to make a coat (Mother’s Day present) – and it’s still not been used. This is the year! I will make that coat!
I love the way the internet and sewcial media can influence and inspire us (usually solitary) sewists. I’ve been following Jing – @jingandtonic, on Instagram for a while now, and I always like what she’s wearing. I like the shapes, the colours and her choice of fabrics. She uses a lot of Japanese sewing books to create her handmade wardrobe, and it’s a good look. The more I saw, the more I was inspired to translate a bit of that into my wardrobe.
Now let’s face it, I am not a 30-something ethnic Chinese lady, so there’s no way the Japanese sizes will ever fit me, and some of those shapes will never suit either – but it’s not about copying. So, inspired by all that, I ordered Clean and Natural on Etsy, and Kana’s Standard I and II on Amazon. I also looked through my copy of She Wears the Pants with new eyes. There are definitely shapes in that book I can use.
While I wait for all the books to arrive, I started a little something. I was digging in the stash for something that I ended up not finding (think it’s been used or given away already) and “re-found” a certain 2m length of an almost gingham weave linen blend in shades of teal, grey and dark damson. It came from Croft Mill years ago! It was one of those pieces I loved, but was unsure about using – not wanting to end up looking like a cowboy wannabe. But my brain was still in Japanese structural shape mode and the lightbulb went on!
I thought it woud be fabulous made in the pattern I used for the windowpane top in the January Burda challenge. A quick check that the pattern actually fitted on the width of the fabric later and I was convinced. This would work! I quickly abandoned the March burda challenge projects mid-sew and made the top! I made it exactly the same as the first top, all the adustments had worked out perfectly so I had no reason to faff with the pattern.
Burda top 121 January 2012
I love the result! The fabric has enough body that it doesn’t drape or hang, but is not so stiff that it feels like I’m wearing a box! And I love it with my Birkin Flares!!! It’s going to be fabulous to wear in the spring (when it finally arrives) and on those rainy, slightly chilly summer days. There really is nothing bad I can say about it.
For someone who does not wear a lot of pattern, especially a large pattern, this top is great! I’m perfectly comfortable in it, and don’t feel like it’s wearing me. Now I want to make some more slim-fitting pants/trousers for the summer to wear with it, because I don’t think it’ll work with my usual wide leg trousers. There will be just too much width! I think with boxy shapes, it’s definitely about proportion.
Front detail
So, what will I make next with this new look? Not sure. I will be pattern cutting anything that takes my fancy from the Japanese books. I need the books to see the shapes and proportions they use, so my patterns can be sort of correct. I definitely will be making some of the tops, I love loose fitting stuff in the summer, I get way too hot in clingy stuff. I like the air to circulate!!
But in the mean time, I have March Burda patterns to make!! How is everyone getting on with the Burdachallenge2018? And the #sewyourstash challenge? And anything else going on in the sewcial sewing world…
I’ve been dusting off a long lost and unused “skill” – knitting. As touched on in the last post, I persuaded a friend to help me to knit again and she taught me how to make a “simple” cable knit fingerless mitten pattern.
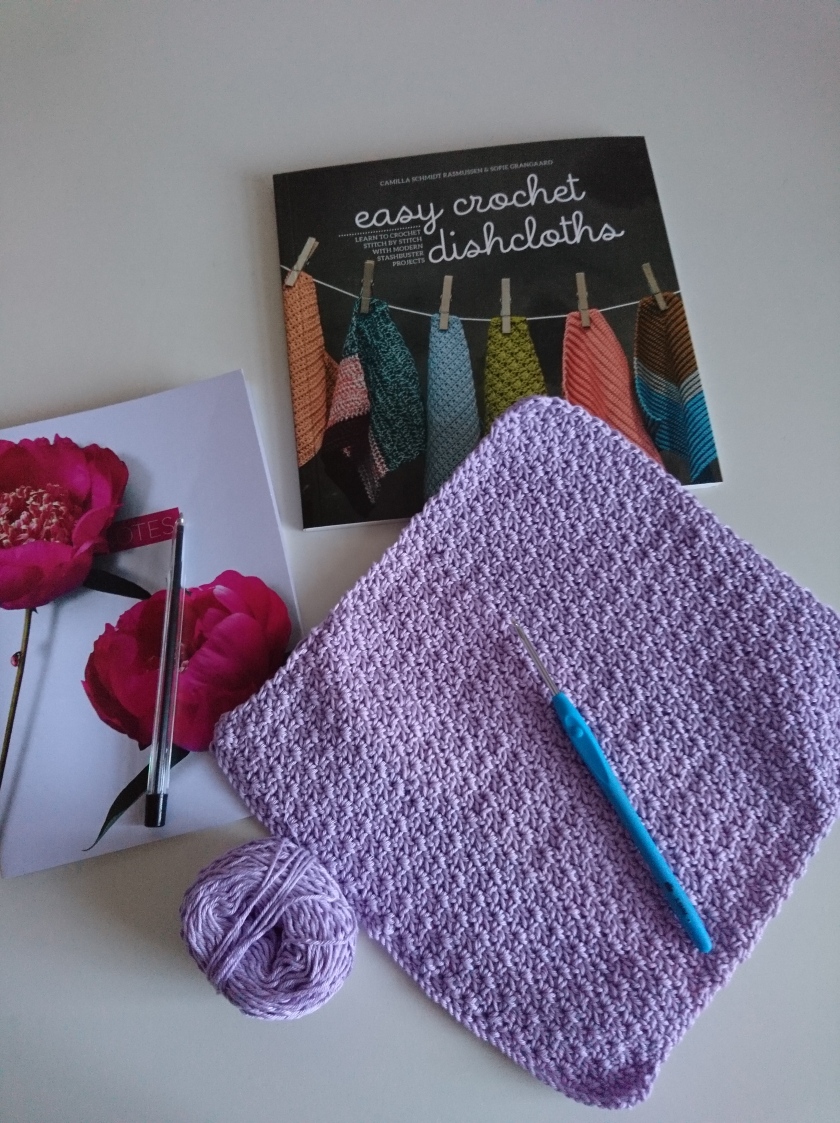
I won’t go into massive detail, but I made three pairs of that pattern, and now I’m trying my hand at a cable knit beanie/hat. That’s going slower, much slower. Because I got distracted again! I dug out my crochet stuff to make (wait for it)…. dishcloths! WTF?? I hear you ask. Have I lost my mind? Well – no…
This year I’ve been thinking more and more of the environmental impact we all have. This world has limited resources and I want to try to do my bit to be more sustainable. This means not buying single-use plastic, recycling more than I did in the past and being more careful with what I throw away. We have become such a throwaway society, because it’s become cheap, easy and convenient for us to do so. We are encouraged to do it by the retailers.
So far this year I have ditched supermarket milk in plastic bottles for glass bottles I bought myself and take to the local farmer/dairy twice a week for refilling, ditched cling film & bought beeswax wraps (going to make my own soon!) and swapped supermarket plastic wrapped veg for the local grocers and farm shops. The veg is cheaper and I only need to buy what I need for that week, saving pennies and food waste. My old shampoo and conditioner in plastic bottles have been swapped for bars from Lush, and shower gel swapped for good old fashioned soap in cardboard boxes.
I’d love to make my own soap and bath salts, that’ll be on the to-do list along with the beeswax wraps. When my toothbrush needs to be replaced, it’ll be with a bamboo one, and I now carry a stainless steel straw in my handbag. Other things I can do easily are to be found in my stash. I made two granny square afgan sampler throws for the girls when they went off to university, and while I managed to sell some of the cotton left over from those projects, I still had a bag of about a dozen balls of Rowan Cotton Glace lying around.
I saw somewhere that someone had made some facecloths with crochet using cotton yarn. So I thought – why not?? I started with just making up a couple of patterns on some actual dishcloth cotton from Deramores. I’m sure you can get it elsewhere too. I was impressed with how these tests worked out, I found the ridges in the crochet worked really well to scrub off those bits that you’d usually need a scourer for. Any stubborn bits get the baking soda treatment, and voila, clean pots and pans! And when they get dirty they can go in the washing machine!
I bought this book on Amazon, and am slowly working my way through all the designs. Some are really quick, others you need to remember to count. I prefer a lighter, lacier design for washing dishes, to be honest, and not too big a cloth either. It’s not easy to get a large, firmly crocheted cloth into a glass. But for drying they’re good, and of course, they don’t have to be used for dishes! Think of the pretty facecloths you can have in the bathroom! I’ll be using up my stash of left over coloured cotton nice and quick now, and have something useful and pretty in exchange.
Next in my sights was to update my shopping bags. I haven’t used plastic bags from the shops in ages, and the “long-life” hessian bags from Tesco have definitely seen far better days! Some have lost their plastic lining (not a bad thing), some are decidedly holey. So I’ll be using scraps of left-over denim from my jeans making to patch the holes, visible mending style. The bags with dodgy lining will have those replaced with linings from fabric in the scrap boxes. I am happy to patch stuff together, so look out for my attempts at patchwork!
A post shared by Anne W (@compulsive_seamstress) on
Speaking of which – I also wanted to make new totes for popping into our local town for bits and bobs. It’s not far and I walk in regularly. I have been collecting the shirts that Mr Not Compulsive has been earmarking for the fabric recycling bin at the recycling centre. I actually can’t see why we need to send these things all the way to India for them to shred and turn into dog blankets. I can see a very good use right here!
I’d seen a pretty, simple patchwork pattern on Wisecraft. I thought this would be perfect for left over fabric scraps and these shirts! I cut the shirts up along the seam lines, removing the collars, cuffs and yokes. Then I cut 25cm squares, including button stands, sleeve plackets and some seam details. I figured it would be fun to actually show what the fabric had been before it was a bag! I sewed 9 squares together, cut that in half horizontally and vertically, rearranged the resulting squares and sewed them back together. I did this kinda randomly, kinda looking at the colours, but totally not following the rules of the patchwork!
A post shared by Anne W (@compulsive_seamstress) on
But I thought it looked too small to cut up for one bag, so I sewed up the rest and put them all together to cut up. Of course, once I’d done that, I didn’t want to cut it up! Cue new project! I thought I’d turn this patchwork square into a throw for using in the garden in the summer, it just needed a back! The local charity shops supplied me with a single duvet in apricot which was the perfect width, just needed to be shortened.
A post shared by Anne W (@compulsive_seamstress) on
By this time I’m thinking I like the kanthas I brought back from South Africa (see picture above), I can do something similar with the throw… So now I’m using up the remains of my embroidery thread making rows of running stitch down this rather large throw! Thankfully it’s keeping me warm in this cold weather while I work!
There was one 9 square square left over after all that, so it got quartered and I decided to make a couple of smaller grocery bags with them. I’d bought a piece of pale blue denim in someone elses’ destash that was just perfect to bulk out the cotton shirting fabrics. I cut 4 squares of the denim, 35×35 cm, the same size as the shirt squares and pinned them together. Then I cut 6 pieces 15x35cm to make the bottom and sides of the two bags. After attaching them all together, I measured the circumference of the top edge and cut a strip 94cm long and 8cm wide. This would be the top edge, folded in half lengthways.
I love seeing the shirt evidence!
Then I cut the handles. There were two pieces the perfect length for holding a bag in your hands (not so long that the bag would touch the floor) or for putting on your shoulder, so I cut them 8cm wide. Then I cut two more pieces 8cm wide, but longer. from the selvage strips that had been cut off the top edge, I zigzagged two 12cm lengths together and sewed one of the with one end under a handle. I wanted a loop that I could attach my house keys to. They usually end up in the bottom of the bag, under the shopping. That’s not terribly helpful when you get back home and need to dig under the spuds before you can get in out of the cold!
The handy loop for my house keys. I like the raw-ness of the inside of the bags.
I sewed a pair of snaps onto the strip so now it’s easy to keep track of my keys. I didn’t line these bags, the denim looks good and to neaten the inside I just used a nice bright orange thread and zigzagged everything. then I used it for the topstitching too, just to tie everything together. I’m really chuffed with my new shopping bags, can’t wait to use them!
And one last trick – I’d made some bags from coffee bean sacks a few years ago, and one had developed a nice big hole in the bottom seam. No problem, using another strip of that pale blue denim, I simply sewed it onto the bottom of the coffee bag, using nice big zigzags. Sorted!
One fixed coffee sack tote.
Now to get back to hand stitching the rest of the running stitches on the throw – I’ve a feeling you’re going to want to see that too, before the summer. Hopefully I’ve provided a little inspiration for using up your scrappy bits, and doing your bit for the planet we live on too.