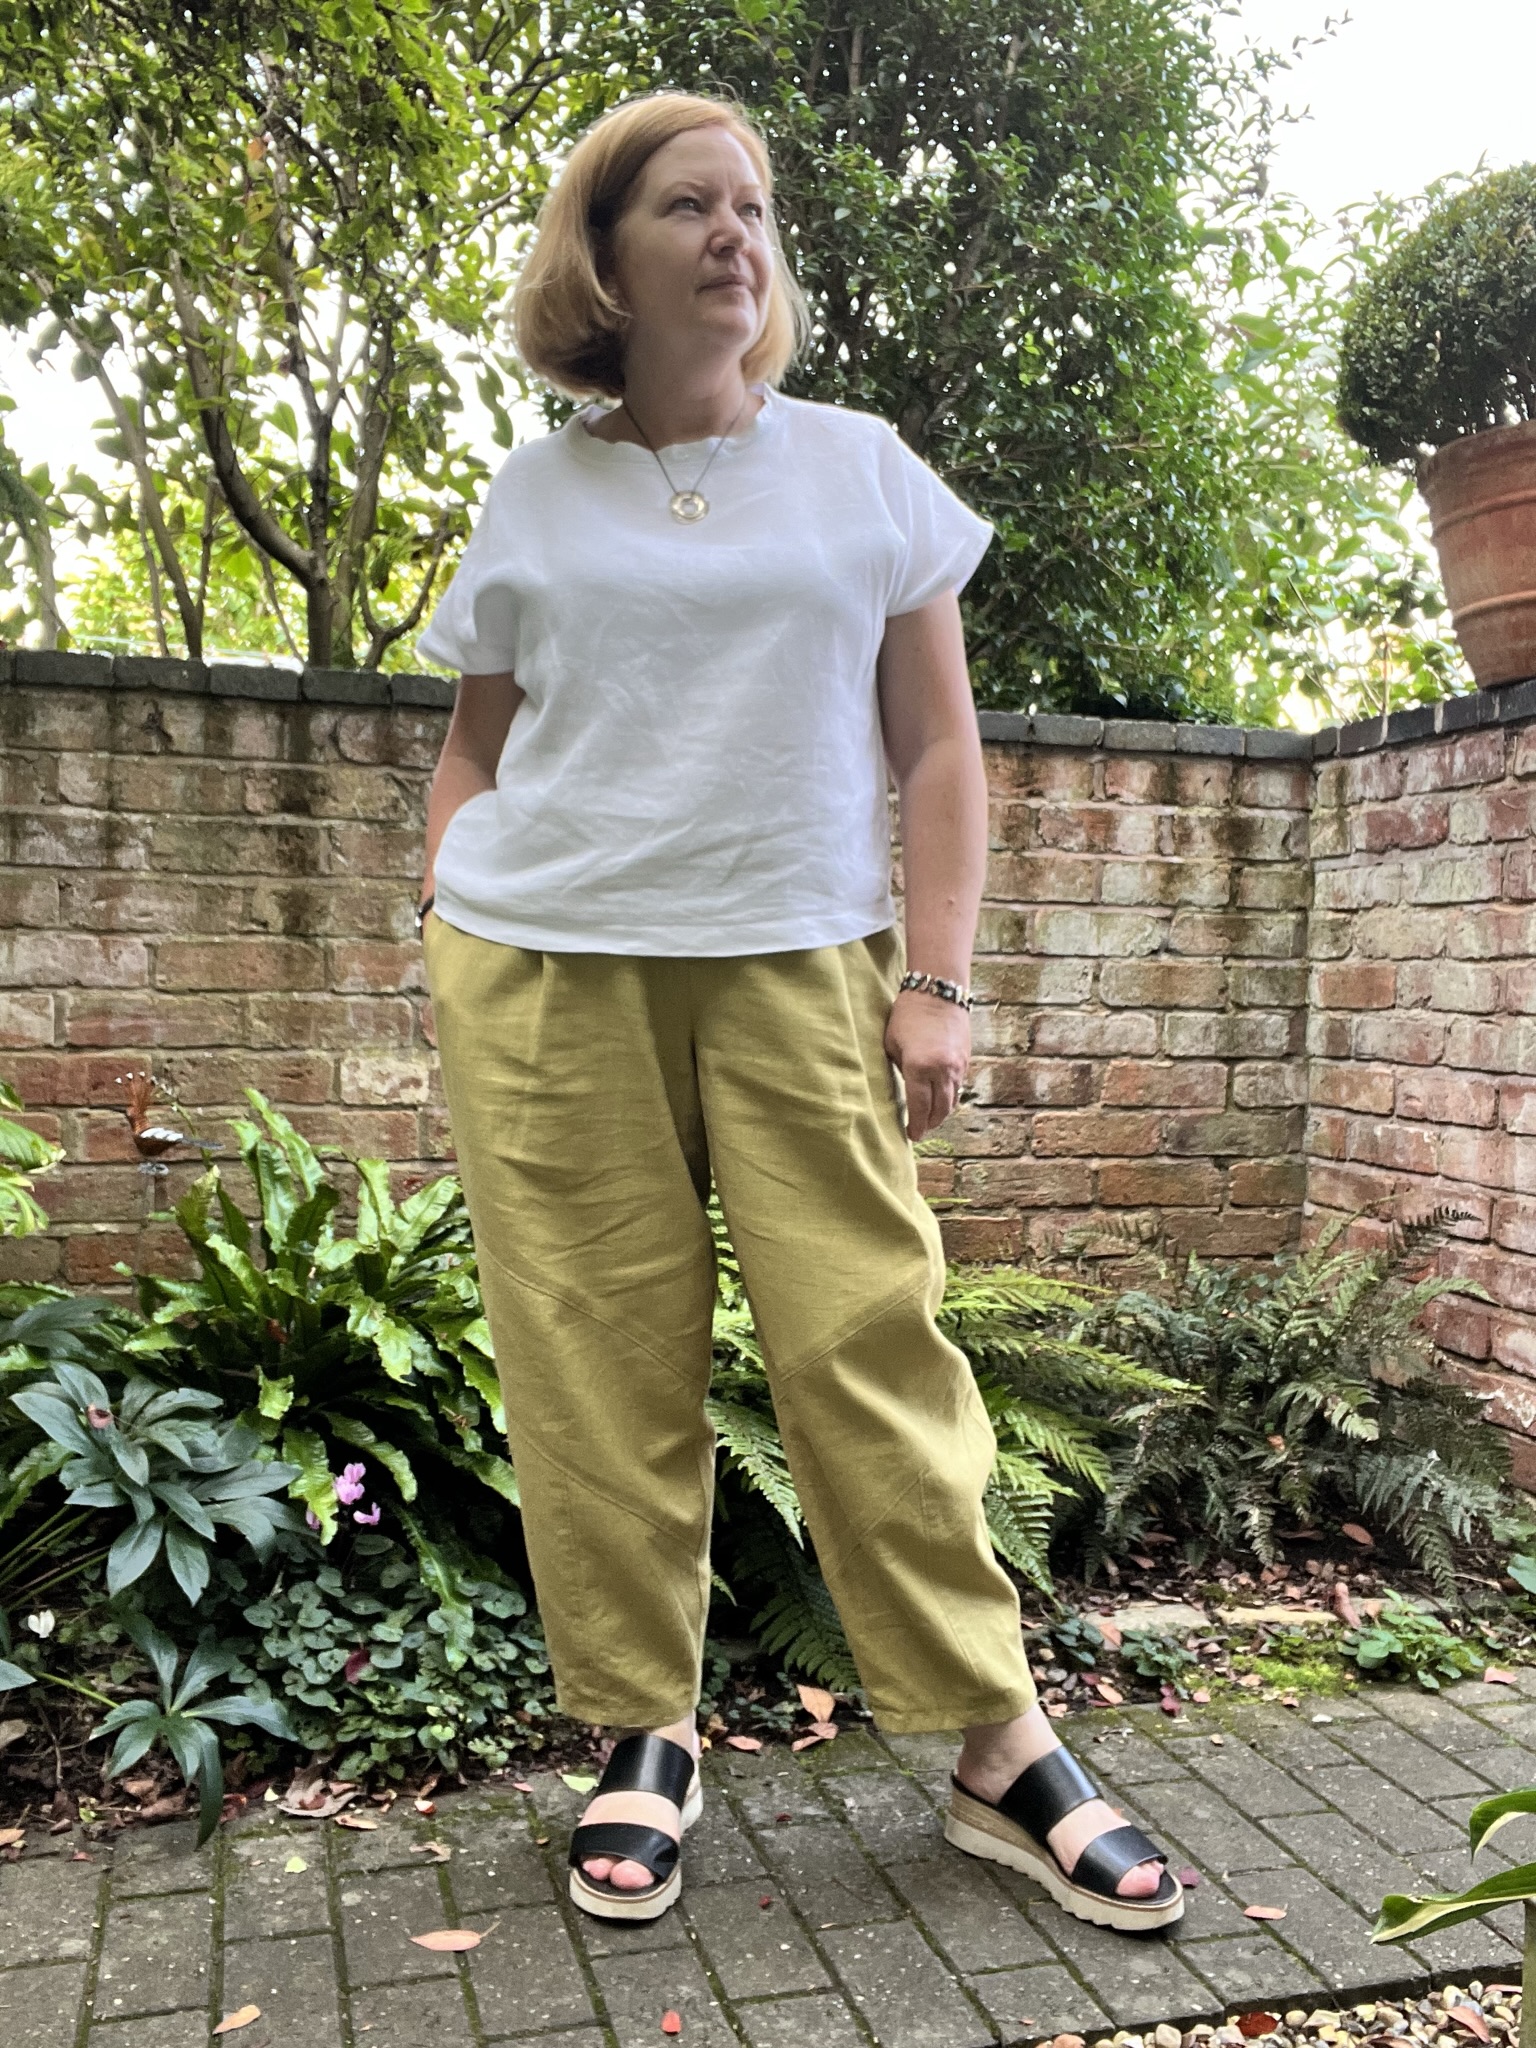
Another pair of linen trousers has been added to the summer wardrobe. Back in January I made a pair of Burda trousers using some crisp cotton chino fabric and said at the time that I’d love to make a linen pair – well, I’ve made them! Pants 106 from February 2020 with the interesting seam detail on the front legs and the barrel shape has proved to be a pattern I like very much.
Seam details on the front leg
The linen is from Higgs and Higgs, chartreuse in colour and with some weight and body, it’s not a light linen, so it’s going to be perfect to wear as the weather cools down (not this week, with its 30 deg C offerings!) I think I jinxed the weather with my last post about cool September and thinking of warmer layers! This week, all I’ve wanted is a swimming pool and a lot of shade!
Back to the pattern – I made it with the same adjustments as the last time, but took it in at the waist in the side seams by 1cm each side. The waistband fits better now, so it was the right choice. As the fabric is a little thick and doesn’t have a smooth texture, I decided to cut the inner waistband pieces from a left over piece of Liberty lawn. The colours go together really well and it feels lovely against my skin.
Liberty lawn to line the waistband
There might possibly be another pair in the works for the winter – I have some lovely pieces of wool.
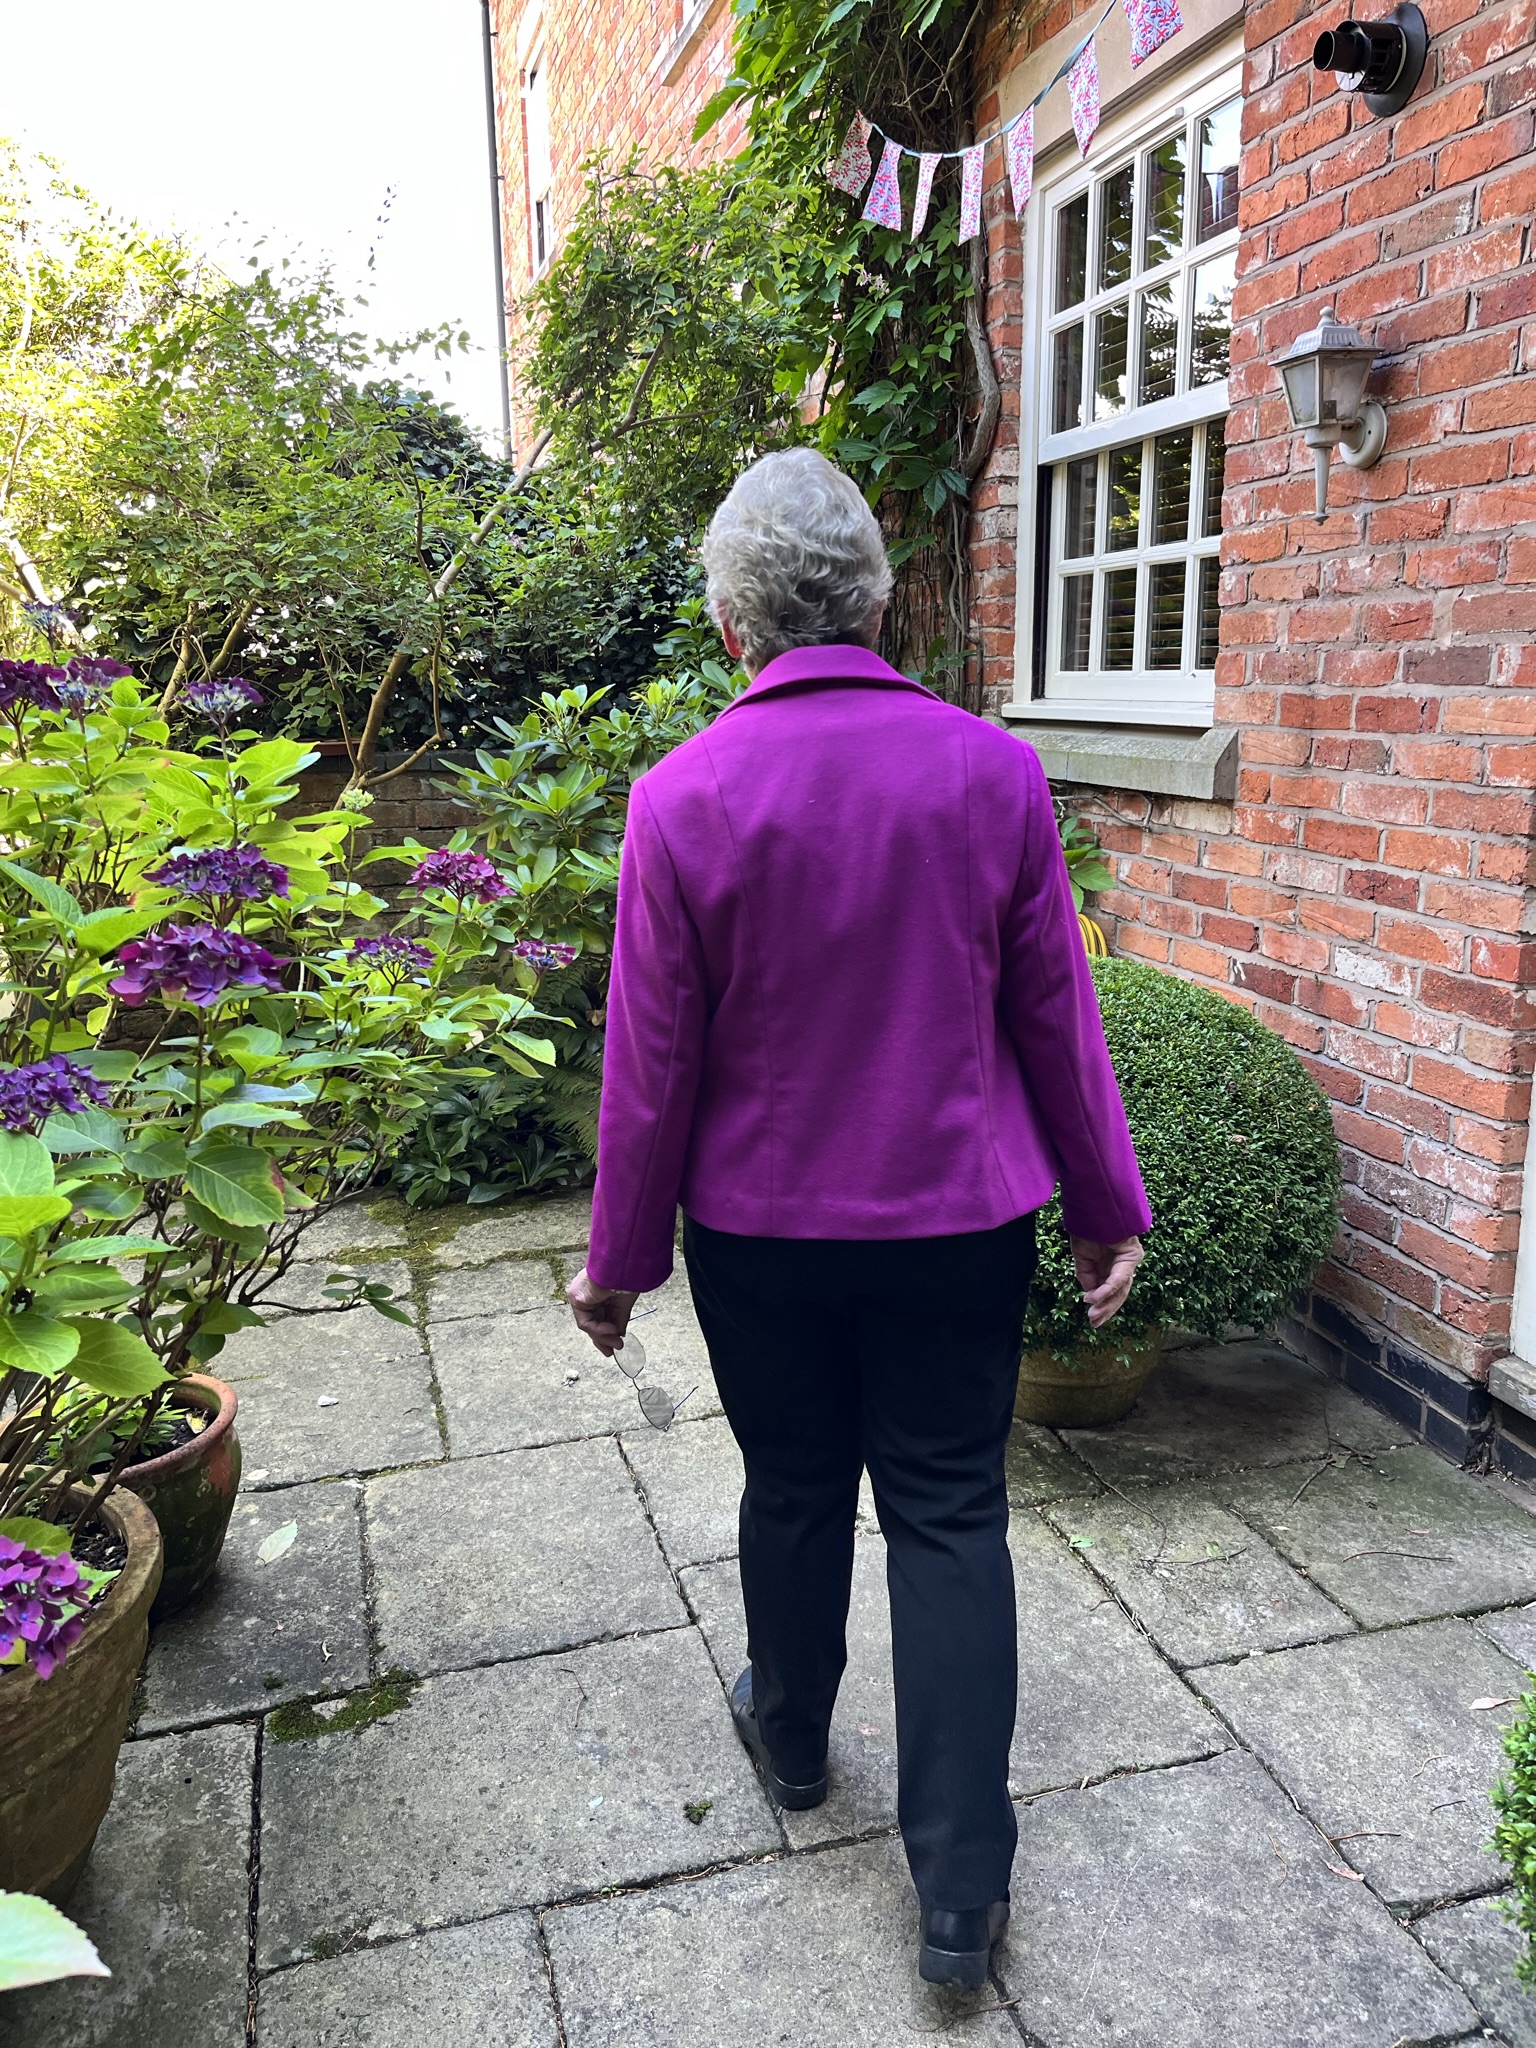
While my mum was visiting, we actually managed a fair amount of sewing, which you wouldn’t know from the lack on Instagram sewing posts! At some point in the first few weeks of her arrival I needed a certain something out of a fabric box in my stash and had a good hunt for it which, of course, lead to “ooh, you have to see this fabric, and this one, and, isn’t this gorgeous???” One thing leads to another and soon the fabric is strewn all over the room, boxes up-ended and a little gooey pile of fabric heaven sits in the middle. Then I opened the wool box…. I don’t remember what exactly was said in order for that box to be unlocked, but it was. One piece of wool in that box was a simply divine magenta pink wool – exact content unknown. I’d bought it back in the mists of time, around 2005-ish, I think. It was going to be a jacket for one of the girls, but they shied away from the intensity of the colour! Mum took one look and said, “That’s gorgeous, but it wouldn’t work on me.” HAHA! Challenge accepted. So I draped it on her and – wow. I made her look in the mirror and we both knew, this was her fabric! But what would we make….
Well, she needed a warmer jacket than the one she’d brought with her due to May’s weather being damp, dull and depressing. So she borrowed my corduroy Burda jacket. You know where this is heading, don’t you? She decided the magenta wool would be perfect in that jacket, lengthened as I had done for myself in the arms and body. So why, when we’d decided that back in May, did I only just finish in the last week of her 3 month visit? We thought we had plenty of time, I thought I had the magazine in my sewing room in the Burda boxes and so we delayed. But time flies when you’re having fun and the magazine wasn’t in the sewing room, but in the loft!
It was eventually extracated and the pattern traced, I traced the 40, 42 and 44, hedging my bets. I toiled the jacket witht he 40 across the shoulders and upper bust, grading out to the 44 over the hips. 5 cm was added to the length of both sleeves and body pieces. But the toile showed I needed to do a lot of work! As a lady approaching her 8th decade, mum has sloping shoulders, a slightly rounded back, forward hips and a little tummy, not to mention that she’s slightly pear-shaped too. So.
Sloping shoulder adjustment of 3cm (!)
Narrow the shoulders by 1cm
drop the front neckline 1cm
rounded back adjustment of 1.5cm
add more to the front and back panel seams and the side seams, from the waist to the hips and hem
Retoile and hey presto, it worked! Now I had one week left to make it all. I couldn’t remember how or if I’d prepped the wool when I first bought it, so I shrunk it using the London method, the batik for the lining, which mum chose, was popped into the washing machine. I used a plain coloured viscose twill lining from my lining stash of offcuts and leftovers for the sleeves. This had already been pre-washed. We found buttons from my stash, fabulous vintage ones!
I love the pairing of the magenta shell with the batik cotton lining, it looks like modern stained glass windows, or boiled sweets melted in the oven for using on gingerbread houses! We tried all sorts of patterns and prints and fabrics with that wool, but nothing really clicked until mum saw the batik. I have to confess that I don’t think I’d have chosen it. So I’m glad that’s a really personal touch! (The patch pockets are lined with the batik too!)
Mum loves it! She pranced around all day when I took the photos, and chose to wear it on the plane back home too! She looked so smart and put together! Unfortunately she won’t wear it much more this year, as winter in South Africa is swiftly drawing to a close now, but she’s ready for it next year!
I found this gorgeous cotton fabric on the Rosenberg stall at the NEC back in March and fell in love. Initially I had a jacket in mind, but soon decided on a pair of trousers. I just needed to pick a pattern. The fabric is quite crisp, with a decent amount of body and absolutely zero stretch or movement. So I went looking in my older Burda magazines for something that didn’t require a certain percentage of elastane.
I happened to have a little stash of early 2000 and late 90s magazines out of the loft storage, so this is where I started. May 2002 happens to be a very good month! As I saw this pattern in the magazine, I remembered that I’d admired the details the first time I’d seen it, and loved it. The pleated hem and the panel front leg lends itself to a bit of playing with pattern direction.
So I decided, what the hell, this is what I’ll make! It’s only 21 years later…. I traced the 44 and 46, toiled the 46 and made just a few small tweaks to the fit. I shortened the crotch depth and at the knee by 2 cm each, and straightened the top curve shape to adjust for having no waist!
There were two style, or non-fitting adjustments I wanted to make. One big one I had to make was to add pockets. Pants need pockets! I drew on the toile where I thought the pocket would be best placed and made it deep enough for my hand and phone. As the front leg is in two panels, it made sense to use the side panel to construct the pocket. The other adjustment I wanted to make was to change the zipper from opening on the side to a front fly. This means that if I have to make any size adjustments I can do it without first taking an invisible zip out!
I’ve worn these so many times since making them back in June, the pockets work perfectly and I just love the pleated hem detail! They’re really comfortable to wear, which I wasn’t expecting given that the fabric has no movement. I have a feeling I’ll need another pair, possibly in a solid colour so that the panels in the leg pieces and the pleats can stand out better, especially if picked out with a decent topstitching thread. I think I’ll have to trace more patterns from this month, it really is a good one!
I’ve been working through my pile of purchases from Croft Mill and those I bought at the quilt show in August/September last year. One of the pieces I got at the quilt show was a gorgeous floral print from the ever brilliant Rosenberg and Son. When I saw it on the stand I knew it would be a jacket, I just needed to choose a pattern. After a short dalliance with the idea of making trousers with it instead, I chose 111 from the August 2021 Burda magazine.
I’ve made this pattern before, so I knew what I wanted to change. If you’ve read my Work in Progress post, you’ll know the ins and outs of my making and decision process. At the time of writing that post I was waiting for the lining to arrive so I could finish off the jacket. And to choose buttons. Or snaps. In the end I went with buttons, dark blue ones with a bit of texture that look just right.
I love the contrast of the vivid coppery lining with the blue and white of the exterior. I wore the jacket to the Sewing for Pleasure at the NEC and the fabric was immediately recognised by Geoff! I love this jacket, I purposely didn’t layer in all the structure and shoulder pads that the black one has. I’m also not regretting the decision not to have pockets! Another thing I didn’t do was to try to pattern match, and any that has happened has been completely serendipitous.
This jacket will be a fabulous addition to my spring/summer wardrobe and I can’t wait to wear it more as the weather warms up. I have a couple more pieces of fabric from those two hauls to make up, and then I need to start on the stuff I’ve just bought at the NEC this month! I have a whole new summer wardrobe planned that will be added to what I already have.
After making the blue spotty Olya Shirt, I decided to use up a piece of navy twill chino fabric I’d got from Croft Mill recently to make another pair of trousers. I’m still on the barrel-leg/ coccoon shape drive, and I fancied a pattern from a Burda magazine that I liked when I saw it ages ago. The panels on the trouser front looked interesting, as did the dart in the hem of the back piece. They are 106 from February 2020. Those panels offer an opportunity, perhaps, to play with stripes or uses variety of fabrics, or to do something a bit fun and different. But not this time.
I traced the 42 & 44, grading out in the waist area for my non-existant waist! I added 1cm to each side seam, and that’s done the job. The crotch depth was shortened by 2cm and I took a 1.5cm wedge out of the back depth too. The leg length was fine once I’d shortened the crotch depth! The legs were still rather baggy for me, I know they’re supposed to be, but too baggy pants just make me look short. So I’m staying with the overall look, just not quite as baggy! From the hip line, I took them in to the 42. This looks much better to me, still had the shape, but not big. And they don’t make me look too short! It’s got to be a win.
I didn’t use the welt pockets as designed, I was concerned that this fabric might go shiny or fade, so I opted for inseam pockets instead. They’re attached to the wasitband at the top so that they don’t flap around like the Style Arc Teddy pants. I used a scrap of African Wax for the pocket bags to cut down on bulk, so there’s a little pop of pattern. As it’s a Burda pattern, the fly zip was a breeze!
These are really comfortable to wear, althought now I’ve worn them a few times I think I’ll be taking them in a little more at the waist. I think another centimetre will do the trick. I definitely will make another pair, but first I have other trouser patterns that I’ve seen and liked the look of. I need to give them all a chance!
I love the colour and the crisp handle of the fabric, it feels perfect for the utility trouser/chino trousers look that seems to be doing the rounds at the moment. It presses well and even after a full day of wearing, isn’t as creased as I’d expect for crisp cotton. However, it has faded a bit. I’ve worn these trousers about once a week since making them at the end of January, and the fabric is not as dark as the left over bits stashed in my scraps box. I think a linen pair would do rather nicely, but for now, I hope that these will be worn loads in the spring/summer/autumn!
I had intended to post this yesterday, but couldn’t get access to my computer and realised that the new Jet Pack upgrade to the phone app doesn’t allow you to create a new post from your phone! I am excited about this project, I think I’ve made the perfect combination of fabric and pattern! The pattern is one I’ve used before, jacket 111 from the August 2021 issue of Burda. I love wearing the black jacket I made before and thought that a lighter weight version would be lovely for spring/summer.
When I made the black jacket, I altered the pattern by adding depth for a Full Bust Adjustment. I had also already altered the collar and front to allow for turn of cloth, I made this allowance slightly narrower because my fabric is less bulky than the last time. I lost the allowance on the front because I wanted to change the look of the front. While the double-breasted design is fine, this time I wanted it as a single. I measured out from the centre front, a 1.5cm buttonstand and added seam allowance and a bit more for turn of cloth, making the same adjustments on the front facing (except the turn of cloth extra!). The pockets also needed work – the original ones were a pain to sew the hem up around, and I always find them too far back, even though they’re in the side seams. I faffed around for a while with placement, etc, but ended up leaving the pockets off all together.
Collar underside detail
So, let’s show you my workings so far. I had already decided not to add too much structure. This jacket has no shoulder pads, so the interfacing, while being in all the important places, is only the lightweight stuff. Gill Arnold is no longer trading, so I bought this batch from The English Couture Company.
I loved the piping detail on the magazine version but it would have been totally obscured with the fabric I used on my first version, so this was my chance! I use a bit of left-over blue cotton twill chino fabric for the piping, but didn’t add piping cord, so it’s just a small flap. I cut 3.5cm bias strips and folded them in half. With the standard 1.5cm seam allowance, the strip sticking out is just 2-3mm, which does the job for me just perfectly. With this fabric, I love the strip of dark blue!
Let’s talk fabric – I bought it from Stitch Fabrics, aka Rosenberg and Sons in the autumn last year at the Quilting show at the NEC. I can’t find it on their website, so I assume it’s out of stock now. It’s the most beautiful jacquard, with a denim coloured ground and an overlaid print of white flowers and leaves. I loved it the minute I saw it on the stand and knew it would be a jacket.
I just love the way the sleeves have turned out with the piping! I made a sleeve facing for the hem, the curve is just too great to allow for an ordinarily turned-up hem. It is so much neater and will allow for the lining hem to sit nicely too. The extra allowed in the upper collar for turn of cloth has resulted in a very nice finish there too, I am happy with the way it’s all going so far! I’ve ordered lining from Croft Mill Fabrics, something bright and yummy!! I didn’t want blue or white on the inside of this gorgeous jacket, so went looking for an orange/paprika/rusty shade. Croft Mill had just what I wanted and I can’t wait for it to arrive! All I still need to do is decide on buttons. Will I have enough in the stash?
Stay tuned for the finished project, hopefully it won’t be too long!!
This is one of those, “Quick, sew!” projects! A friend of mine let me know this week that she’s heading to South Africa at the beginning of September, and would be able to take something non-bulky/lightweight over for me. I immediately thought of the fabric I’ve been hoarding for making tops for my mum. She has a favourite pattern that we’ve been using for years now and thankfully it really is quick! If you want to know which one I’ve used, it’s Burda 134, March 2004.
Burda 134, March 2004 in cotton from Rosenberg & Sons
Lawn from Rosenberg & Sons
The pattern in the magazine is from one of their designer collaborations, and if I remember correctly, was all in white with a skirt. The top had bias strips of fabric stitched diagonally across the front. That wasn’t going to be staying for a practical top for Mum! It also had no hems or neckline treatment, which I have definitely changed! The hems are 1.5cm and I added an allowance in order to have a bias trimmed neckline.
Cotton fabric given to me by a friendSlightly thicker cotton, great for cooler weather
I pulled four pieces of cotton of different weights from the stash, one being a piece of Liberty lawn. The two lightweight fabrics were bought from M Rosenberg & Son (Stitch Fabrics), the purple and teal fabric was given to me by a friend, and the pale blue and grey thicker cotton was bought a long time ago from one of my trips to Sewing For Pleasure. The two thicker fabrics will be worn in cooler weather. The climate where my mum lives is hot and humid in the summer. The top is a loose fit, bias cut, short sleeve with a simple bias strip neckline treatment, which works brilliantly for her. I have honestly lost track of how many of these tops I’ve made since 2004! They’re completely different in all the different fabrics and colours I’ve used. I’ll be making more of these again next summer, I’m sure!
I fancied this pattern when I saw it in the Burda magazine, August 2021. It’s pretty straightforward except for the neckline. And was what I liked – and was wary of at the same time! I had a feeling that this would be one of those patterns that made a cool looking garment, until the first time it was washed. Then it would be a royal pain in the butt to iron and get to sit properly again. I figured fabric choice was going to be key here.
So I left it for a while until I found some organic cotton jersey at Croft Mill which was nice and sturdy when it came, has stretch but not masses of drape, had body but wasn’t thick. I thought this is it, I’ll make that top with this stuff. I thought about doing a FBA for about 5 minutes after tracing the 44, looked at all the odd shaped pieces and then decided not to bother… Lazy. So there are no alterations on this.
It wasn’t overly complicated to put together, but the fabric wanted to roll to the right side all the time, which was annoying, and irritating when I needed it to sit still and stay put! The instructions have you insert the sleeve after the s ides are sewn up, but with jersey tops you usually put the sleeve in on the flat. The head on this pattern is very high which has lead to some makers getting a nasty poof s tthe top. I took one look at it and lowered the head height a bit – completely by eye. It’s better than some look, but really – it’s unneccessary to have a sleeve head like that on a jersey top!
The asymmetry of the neckline is cool, worked ok when flat. But my prediction was right – it is a pain in the butt to iron after washing!! But I love it so much that as soon as it’s back in the wardrobe, it’s out again. I’ve worn this top so many times since making it back in December!! I hadn’t realised it was that long ago – apologies for the extremely late blog post! I will make this again, and in this sort of weight fabric. A jersey with more drape than this would go straight into the bit at the first attempt at ironing the neckline and a stiffer jersey would be too thick. Perhaps a thin viscose ponte would be nice.
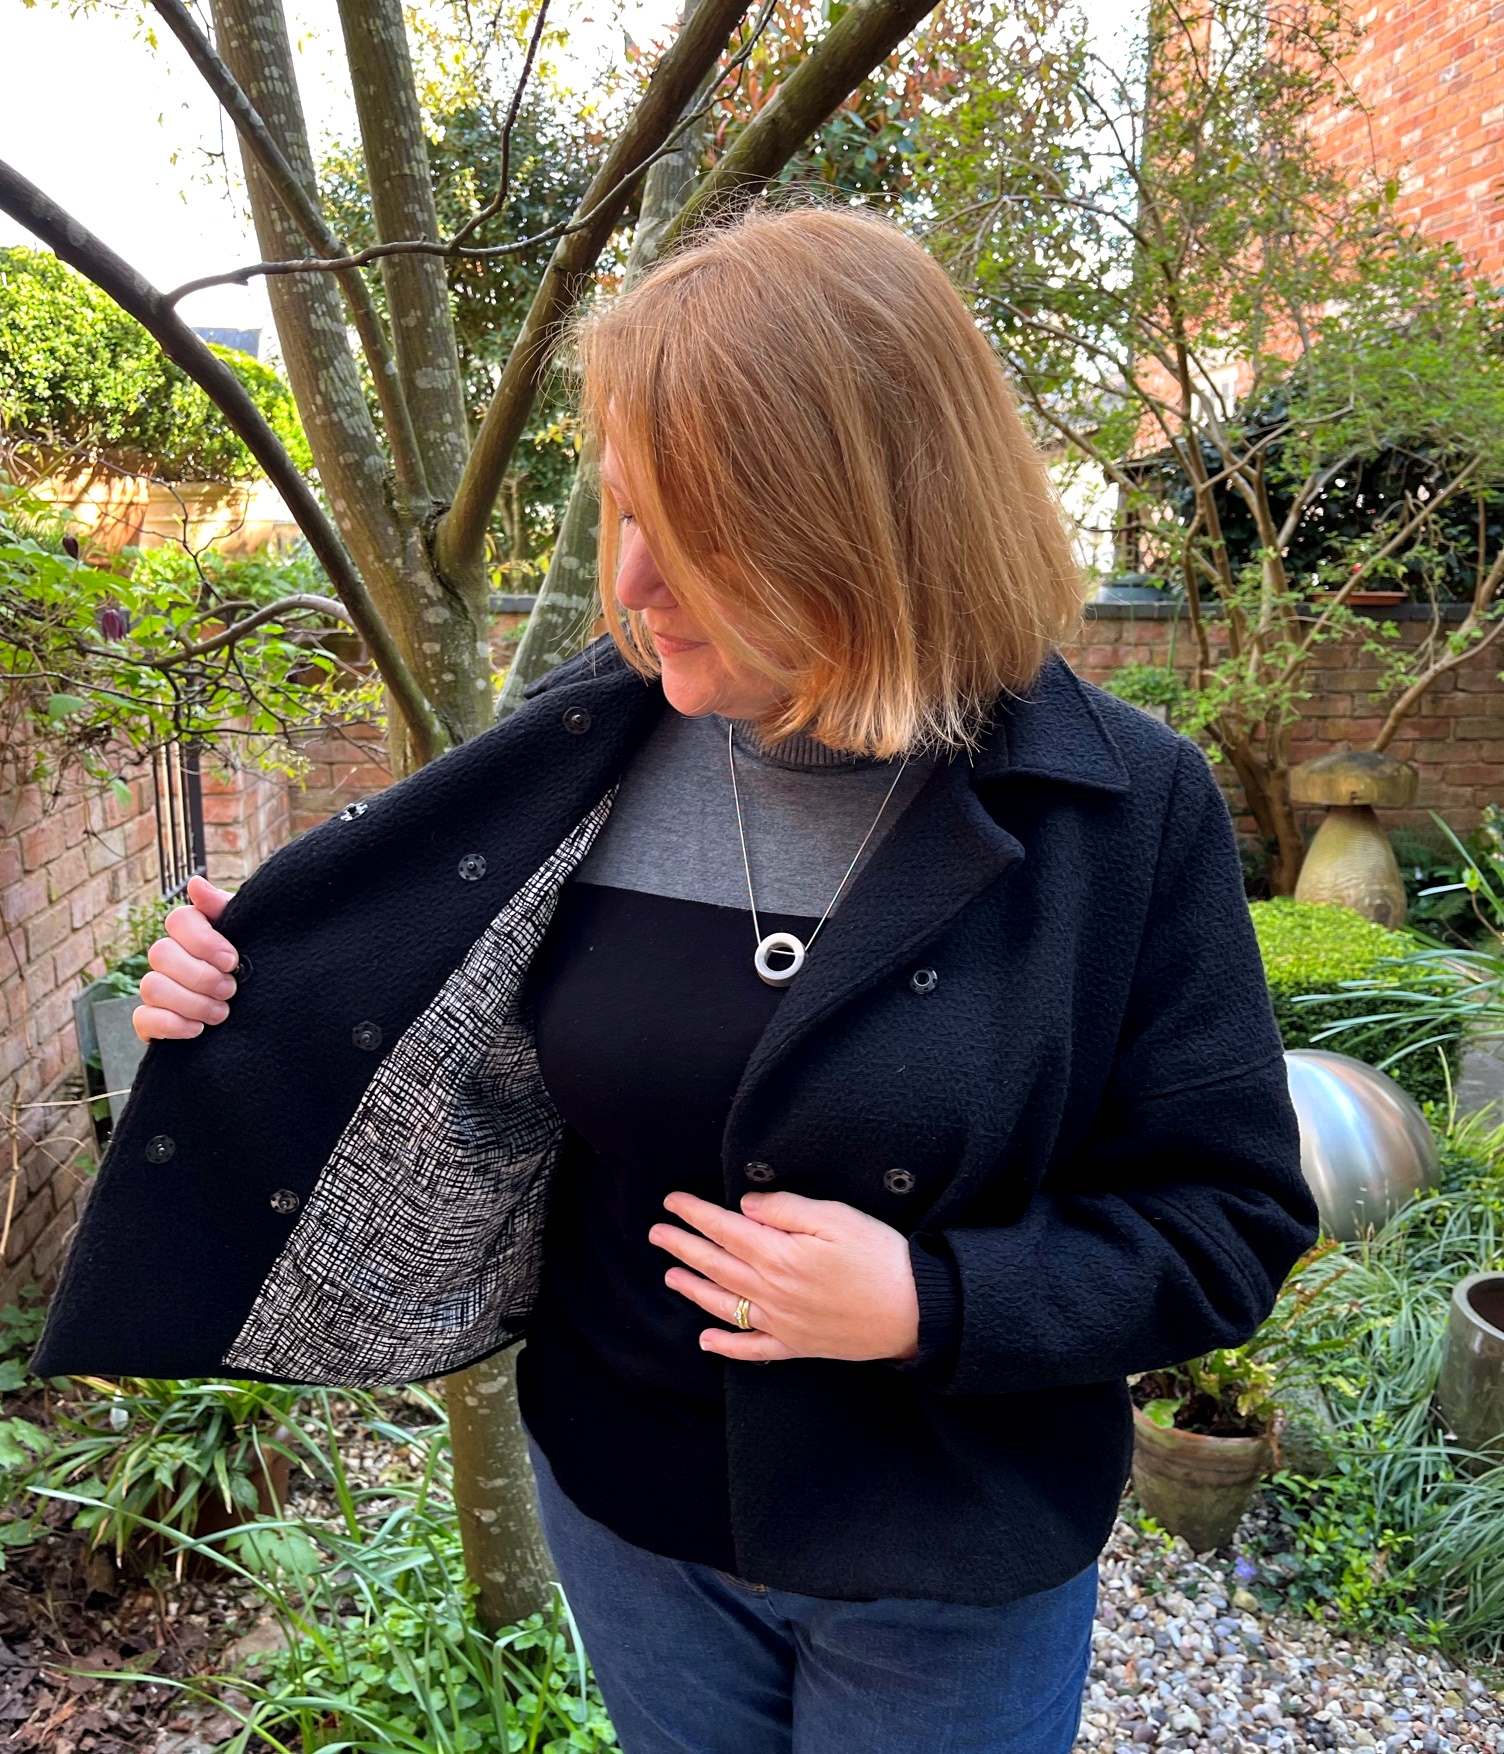
Way back last year in November, I was making a little black jacket – one I had hoped would be the warmer version of my little navy linen jacket that is so useful in the summer. The pattern is 111 from the August issue of BurdaStyle magazine, 2021. I’ll have to link to the Work in Progress post – it’s so long ago now!! The details of what I needed to adjust for fitting are in that post, as well as a tutorial on how I do my in-seam pockets. I took photos not long after the jacket was completed, but wasn’t entirely convinced with it. Why? Well, I wasn’t happy with the way the fabric behaved while sewing, for the most part.
Burda jacket 111 August 2021
Despite being washed, dried and ironed well before use, it shrunk again in the construction process, something I only discovered when I put facings to the shell, and tried to mark the positions of the snaps. However, despite those initial misgivings, I have to say I rather like this little jacket! It has been used on those days when I don’t need a coat, and is nice and roomy so a thick jumper can fit underneath!
Lets get into the details shall we? The body is not fitted, the boxy shape allows for the addition of snuggly jumpers and rolled up scarves. I also love the back pleated into a yoke, plenty of movement in this. The sleeves too are not fitted. They are constructed in three pieces and have a balloon shape – again with the jumpers, you don’t feel like the michelin man with your jumper bunched up in a too-tight sleeve!
Lining leftover from the rust corduroy Burda jacket made a couple of years ago
The texture on the fabric stops the black from being plain and boring, and the use of the patterned black and white viscose lining lifts the interior. I went with plain black snaps, uncovered, to give a more sporty look to the jacket. The only criticism I have about the jacket is the pockets.
They’re too high up and too far round in the side seam to be comfortably used. You really cannot put anything in there that you wouldn’t want falling out either, they don’t scoop much and I definitely don’t put my phone in these. And in the making up – the pocket bags are in the way of the sewing up of the hem! The lower opening of the pocket lines up directly with the turned up hem edge. I had to so some serious detouring around the pocket bags. Next time I’ll make a patch pocket with a welt opening, similar to that of the Pepernoot coat from Waffle Patterns. If I even bother with a pocket at all, the jacket is quite short, so hands in pockets means elbows out and bumping into things.
But – with all the pocket palava – I still like this jacket. I have reached for it often and I really like the shape. I still have that pile of old holey jeans waiting to be magically turned into something fabulous, and I’m getting quite keen ideas on using some of those to make another of these little jackets – unlined and with patch pockets!!
I’ll recap those items I’ve made and not “reviewed” during April, and try to keep up with the new stuff. I think this year will be slow sewing for myself, and quicker sewing for the girls and the other half. I seem to recall I promised him some self drafted shorts last summer…..
When you live in trousers, they’re not simply a wardrobe basic, they’re an essential item! I decided to add some pleated trousers to this year’s Autumn/Winter wardrobe, and have finally made something from one of the Burda magazines from this year. Burda have, unfortunately, not exactly been exciting this year. Only a couple of patterns have caught my attention, and until August, none caught it enough for me to actually bother to trace. But this pair is different, it’s 119 from August 2021. What caught my eye was the small pleats on the front, the neat waistband and tapered leg.
Trousers 119 Burda August 2021
I traced the 44 and 42 and made an adjustment to the height of the waistband. While I liked the neatness of it, I also knew I’d prefer a slightly deeper waistband. I toiled the 44, but started grading towards the 42 from the hip down. The toile was successful, I only had a couple of adjustments to make.
Not making my usual shorten the length adjustment – this style should be slightly cropped, but it’s heading to winter and I don’t want cold ankles!
Altered the CF line – straightened it a bit so it was 5mm further out at the top, giving me an extra 1cm overall.
Took in the inseam by 1cm front and back from crotch to knee.
Made the waistband 1cm deeper.
The adjustments have worked well, I like the fit on these, so will be making another pair soon. I will, however, make them a little longer. The length looks good, and while it’s not freezing, they’re fine, but I want a longer pair! So the next pair will be 3cm longer. Looking at the photos, I think I need to take in a bit more on the inseam, it looks a bit baggy there, but I also need to remember that these are not supposed to be skintight!
In-seam pocket details
In toiling, I realised there’d be a lot of bulk at the waistband from the pockets, so I cut a pocket facing for the back pocket piece and rifled through the stash of scraps for a lightweight bit of pretty cotton. I found I had just enough to cut the rather-large-for-Burda pockets from the pretty stuff, and only tiny bits leftover to head into the stuffing bag. These inseam pockets are a really good size, phone in one and mask and card wallet in the other, with space to spare for hands!
The trouser fabric is a cotton twill in Mocha bought from the Rag Shop in August, I don’t think they have any of that colour left now. It’s Kobe cotton twill, and it’s also one of those fabrics you need to be sure to wash inside out. I washed the trousers after the first wearing without turning them inside out and the creases formed while washing have lost a bit of colour. This means that all folded edges will lose colour too. I wouldn’t mind if it was a cheap, £7/m fabric, but it wasn’t. I haven’t bought a Robert Kaufman fabric before, and it might be joining Lady McElroy fabrics in the “avoid” pile due to colour fade. It’s beautfully soft though, and lovely to wear. Just watch the colour fading.
Detail shots
I wore these for the first time on a long weekend trip to York, they were very comfy to wear traipsing round the city all day. They’ve since been worn a few times and I really do like the pattern. I know Burda don’t have the best sizing these days, they used to go from a 34 to a 46 in the “everybody” section of the magazine, but these are just 36-44. I feel they are trying to save money by reducing the sizes available, the number of patterns in the magazine and the quality of the magazine paper itself. It’s a shame, as the old magazines were fabulous! Perhaps a revisit of those older magazines is in order.
York Minster behind, trousers worn with silk Burda top made in 2018.
In the mean time, I’ve traced a jacket pattern from the August issue to toile, I have a retro (90s) pair of Burda trousers to show you and I have Lander pants to make for both girls – not to mention a VikiSews blouse for daughter no1 and a Bellatrix blazer for each of them. Thank godness the garden and allotment have stopped shouting for my attention!