Ink Blue Flowers

I found this gorgeous cotton fabric on the Rosenberg stall at the NEC back in March and fell in love. Initially I had a jacket in mind, but soon decided on a pair of trousers. I just needed to pick a pattern. The fabric is quite crisp, with a decent amount of body and absolutely zero stretch or movement. So I went looking in my older Burda magazines for something that didn’t require a certain percentage of elastane.

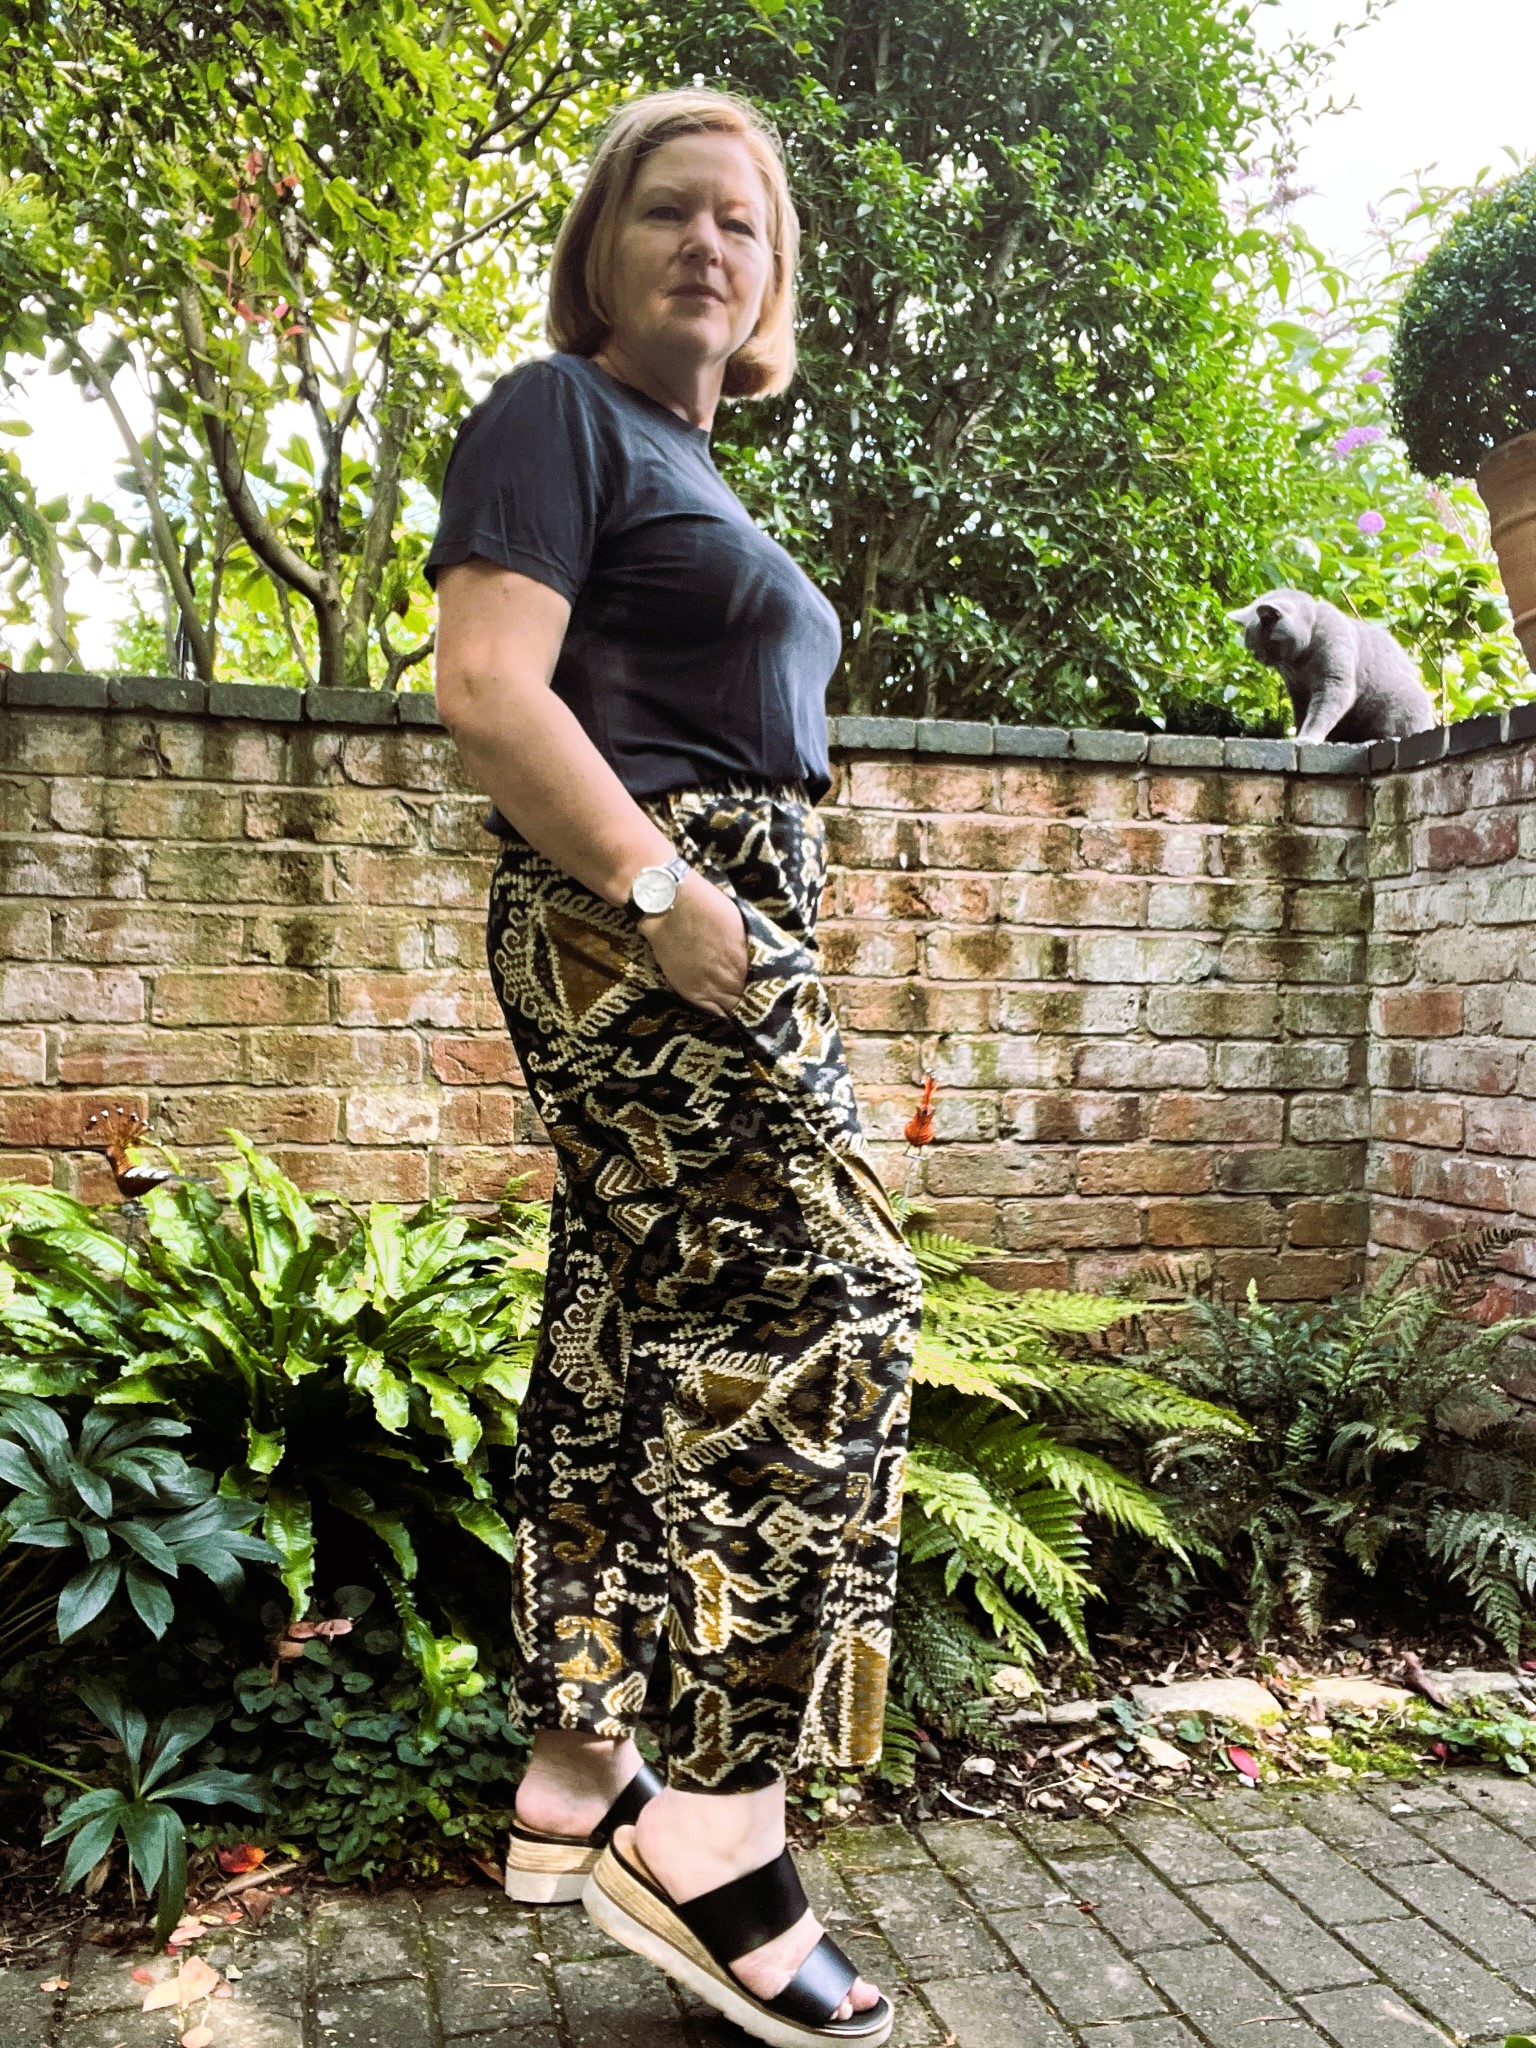
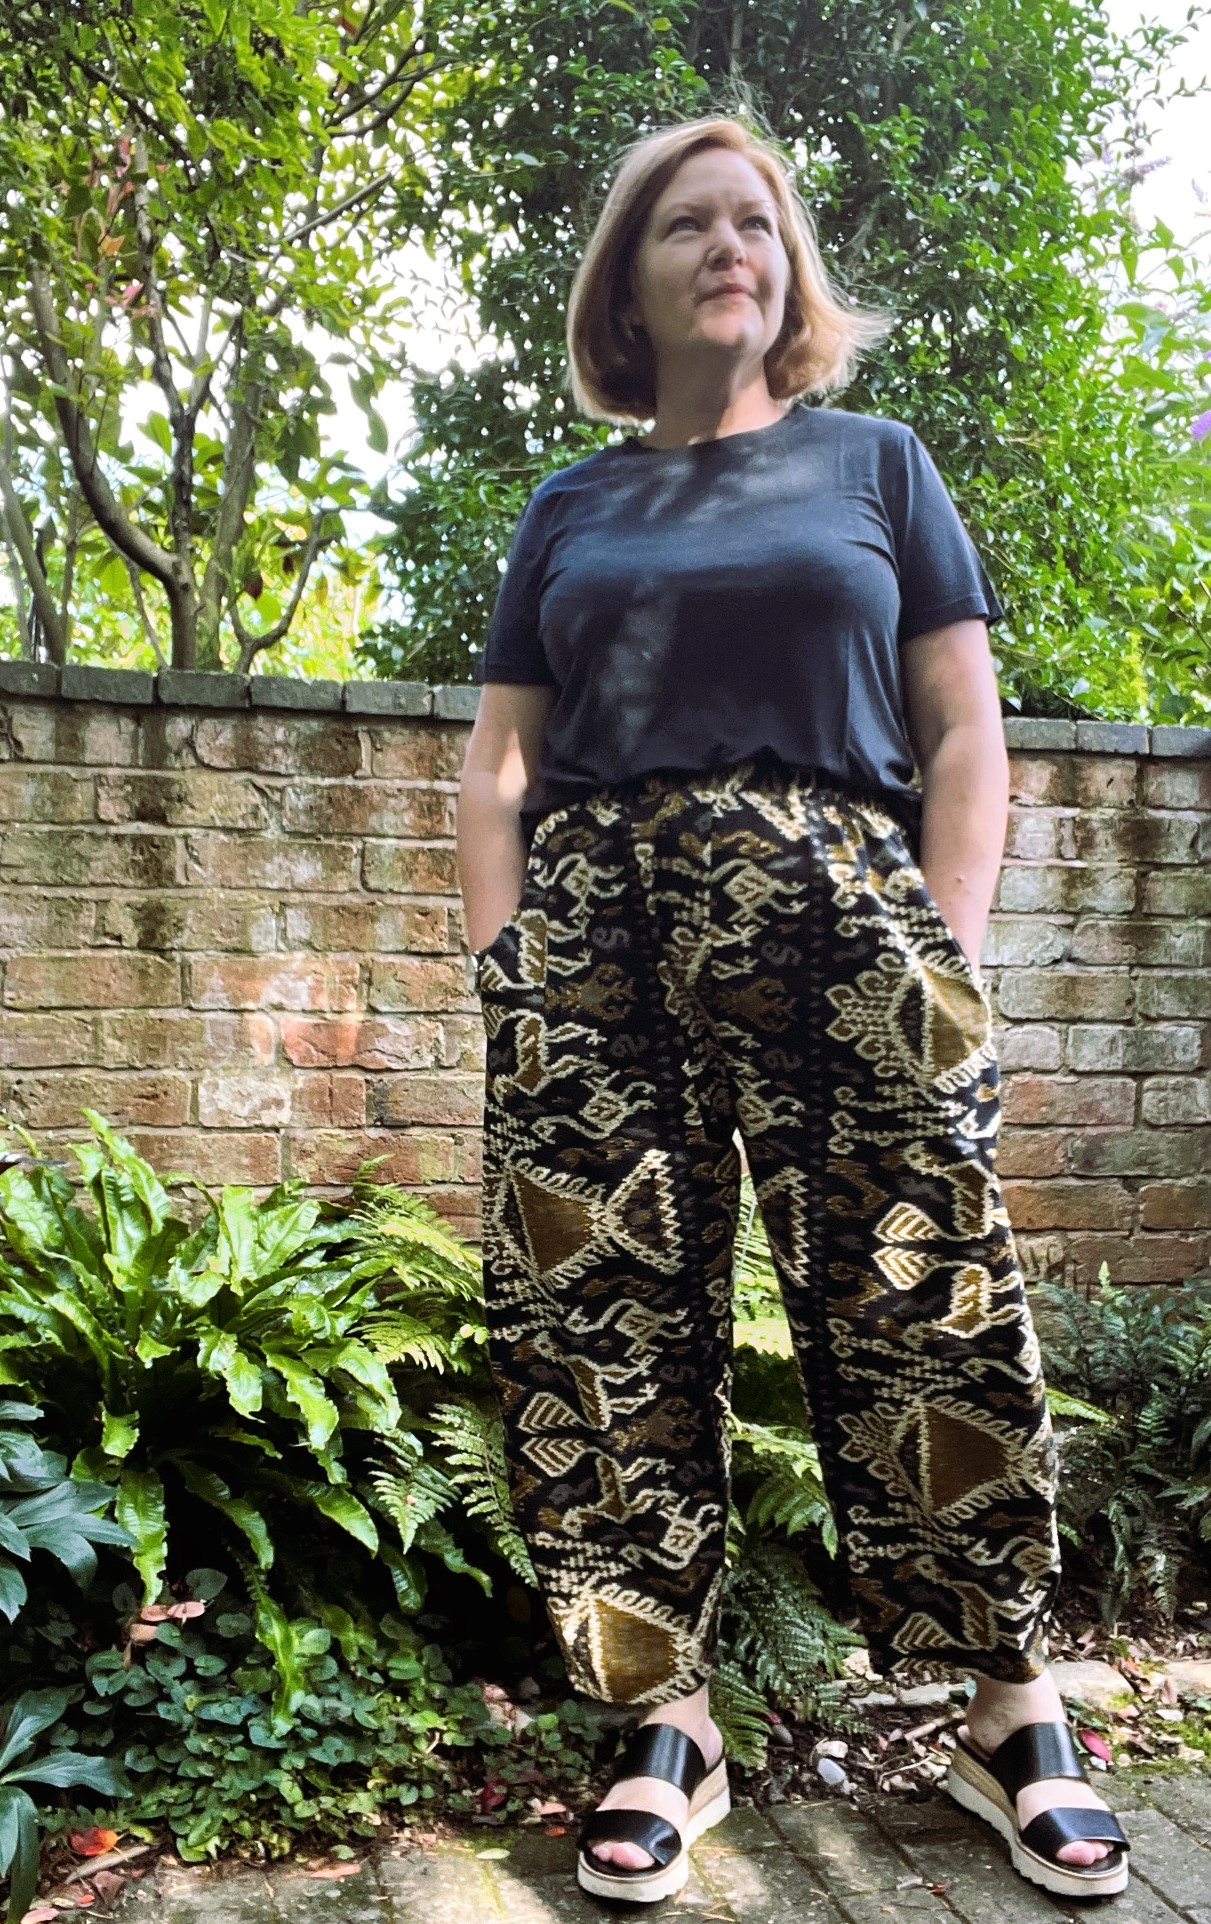
I happened to have a little stash of early 2000 and late 90s magazines out of the loft storage, so this is where I started. May 2002 happens to be a very good month! As I saw this pattern in the magazine, I remembered that I’d admired the details the first time I’d seen it, and loved it. The pleated hem and the panel front leg lends itself to a bit of playing with pattern direction.

So I decided, what the hell, this is what I’ll make! It’s only 21 years later…. I traced the 44 and 46, toiled the 46 and made just a few small tweaks to the fit. I shortened the crotch depth and at the knee by 2 cm each, and straightened the top curve shape to adjust for having no waist!

There were two style, or non-fitting adjustments I wanted to make. One big one I had to make was to add pockets. Pants need pockets! I drew on the toile where I thought the pocket would be best placed and made it deep enough for my hand and phone. As the front leg is in two panels, it made sense to use the side panel to construct the pocket. The other adjustment I wanted to make was to change the zipper from opening on the side to a front fly. This means that if I have to make any size adjustments I can do it without first taking an invisible zip out!

I’ve worn these so many times since making them back in June, the pockets work perfectly and I just love the pleated hem detail! They’re really comfortable to wear, which I wasn’t expecting given that the fabric has no movement. I have a feeling I’ll need another pair, possibly in a solid colour so that the panels in the leg pieces and the pleats can stand out better, especially if picked out with a decent topstitching thread. I think I’ll have to trace more patterns from this month, it really is a good one!

What is it with Style Arc Pants?

Sneaking in with a regular post while I carry on with the “catching up”posts so that I can at least attempt to stay current! For a while now, I’ve seen the Bob Pants from Style Arc – they always look cool on people, and when I check to see what cool pattern they used, it’s almost always the Bob Pants. But I really didn’t want elastic waistband pants, no matter how cool I thought the leg shape was. Eventually, this year I caved. This is the third pants pattern I’ve bought from Style Arc, and if it really is as good as the others, I’m going to make many! Style Arc just have interesting details in their trousers, and as I live in trousers, this is a very good thing!

Style Arc Bob Pants

Of course, with how busy it’s been this year, tracing and trying out the pattern had taken a back seat. I also wasn’t quite sure of what fabric I’d be using, despite the growing piles in my fabric cupboard… I traced this week, deciding on the 14 and 16, given the Style Arc size table. The size table isn’t on the pattern, so you have to check online before deciding on your size. Being Style Arc, the instructions are brief, but as this is a simple pattern, you don’t need much.

I decided to do away with making a toile and just went straight in with a piece of cotton fabric I’d found in a charity shop. The selvedge stays it’s “Dutch Java print”, but it’s the colours the sealed the deal for me! I’m not mad on many patterns, but this one just spoke to me.

Construction wise, it’s straightforward. First make the in-seam pockets (find a tutorial for how I do them here), then all side seams, followed by the crotch seam. Attach the waistband, insert the elastic and turn up the hem. Done! I did it this way, rather than the way the instructions suggest. They have you zigzag the elastic to the waistband before attaching it to the top edge of the trousers, but I wasn’t sure whether the suggested elastic amount would work for me or not, so I did it the simpler way.

I really love these pants now! Elastic waistband the works! I made the elastic just a little tighter than recommended, it fits nicely so I’m happy. The colours and the print of the fabric are a little loud, but I love it, will always wear it with a plain top (although I think I might have a stripe that’ll work) and I’m happy that these won’t be relegated to pjs! I think I can see more Bob Pants in my future.

My little fluffy photobomber

Catching up

It’s been such a long time! April disappeared in a whirl of getting ready for a three month visit by my mum, then May, June and July disappeared in a whirl on visits, gardening, chatting and a bit of sewing. There definitely was not as much sewing as I’d anticipated, but that’s really not a bad thing, we made what we needed to, and did other things instead!

However, there have been a load of things made and not blogged. Not all of it is overly exciting, but I like to keep tabs on it anyway. The last thing I showed off that I’d made for myself was the Spring Jacket. Since then I’ve made a pair of jeans, using a favourite older Burda pattern, two more Worker Trousers, two Stellan Tees, a Block Tee, and a pair of cropped Burda trousers. For mum, I’ve made a pair of linen trousers using a Simplicity pattern, loads of tops from her favourite Burda pattern and a fabulous jacket using yet another favourite older Burda pattern! So there’s a load to catch up on!

I think I’ll just cover a few projects in this post, starting with a couple of pairs of trousers. First up is a pair of Worker Trousers, made in cotton twill bought from Croft Mill last year. I made one pair in that colour and loved the fabric, but wanted a different colour. So I dyed it terracotta and love the result! I’ve worn these loads. I love the fit of the Workers, I think they might just be my new favourite pattern!

Next up is a pair of Kana’s Standard trousers, made in lightweight denim. I really needed something comfy, with plenty of pockets, to wear on the allotment. I know some people will think I’m mad to make something new to wear in the allotment, but they’re not neccessarily exclusively for the allotment! I cannot remember where the denim came from, but it’s been sturdy enough to stand up to the allotment, and at the same time, cool enough to wear on the warmer days and not turn me into a sweaty mess!

Another quick, cool project I’ve completed for the summer is a new Block Tee. The fabric was bought at last year’s Festival of Quilts, I think from Stitch Fabrics. The rainbow print in just black and white is quite nice, and much more “me” than a rainbow coloured print! It’s been worn loads, so a worthwhile contribution to the wardrobe.

I bought some cotton jersey in March at the Sewing Show at the NEC, two of which I’ve made up using the Stellan Tee from French Navy Now. They’ve been an invaluable addition to the summer wardrobe. I realised last summer that most of my tees are dark, which isn’t ideal in the hot sunshine. This is a quick, easy tee to run up, especially if you’re not adding the little pocket. They’re loose and boxy, which allows plenty of air in to keep you cool!

I’ve always been partial to a stripe, there are another two striped cotton jerseys waiting in the stash to be made into tees! I’ll be using the Basic Instinct pattern for the other two though, I don’t want all the stripey tees to be in the same pattern. I managed to get the shoulder stripes to line up pretty well too!

That’s a decent enough catch up for now, there’s still more though, but I don’t have photos. Hopefully I can get on with more catching up soon!

Vintage Jacket in Corduroy

I made this corduroy jacket for Daughter No2 back in January, but hadn’t got the chance to get photos of it on her until now. You can read the details of how it all started in my first Work in Progress Wednesday post of the year. The pattern is one that’s been in my stash for a while, so I was really glad of the chance to use it.

The adjustments listed in that post were quick and relatiely simple, and I stuck with just adding lining and interfacing where it really needed it, no shoulder pads! I lined the pockets with a left over scrap of shweshwe from a blouse that Daughter No 2 had made for herself last summer. I love a lined patch pocket, they’re so nice and neat!

There hasn’t been much to say about this particular project, the fabric was bought from a friend who had expected a wider whale of cord to turn up after buying it online, so it was not fit for his purpose – but perfect for mine! I am now out of the champagne coloured bemberg lining, that’s found its way into three projects now! I’d call that a win for stashbusting.

The weight of the jacket is perfect for autumn/spring, and its already had a few outings so far this sprint. I have been assured that she loves it, so that’s good enough for me. I wonder if she’d like one in linen for the summer….

Spring Jacket 2023

I’ve been working through my pile of purchases from Croft Mill and those I bought at the quilt show in August/September last year. One of the pieces I got at the quilt show was a gorgeous floral print from the ever brilliant Rosenberg and Son. When I saw it on the stand I knew it would be a jacket, I just needed to choose a pattern. After a short dalliance with the idea of making trousers with it instead, I chose 111 from the August 2021 Burda magazine.

I’ve made this pattern before, so I knew what I wanted to change. If you’ve read my Work in Progress post, you’ll know the ins and outs of my making and decision process. At the time of writing that post I was waiting for the lining to arrive so I could finish off the jacket. And to choose buttons. Or snaps. In the end I went with buttons, dark blue ones with a bit of texture that look just right.

I love the contrast of the vivid coppery lining with the blue and white of the exterior. I wore the jacket to the Sewing for Pleasure at the NEC and the fabric was immediately recognised by Geoff! I love this jacket, I purposely didn’t layer in all the structure and shoulder pads that the black one has. I’m also not regretting the decision not to have pockets! Another thing I didn’t do was to try to pattern match, and any that has happened has been completely serendipitous.

This jacket will be a fabulous addition to my spring/summer wardrobe and I can’t wait to wear it more as the weather warms up. I have a couple more pieces of fabric from those two hauls to make up, and then I need to start on the stuff I’ve just bought at the NEC this month! I have a whole new summer wardrobe planned that will be added to what I already have.

Don’t buy it, I’ll make it

This adventure all started back at the end of January when daughter no 2 sent me dozens of links to oversized, long, black winter coats. She wanted my opinion on the best one for her to buy, but I had a problem. They were “Debenhams” – just Boohoo in disguise. I really don’t want to support the sort of business that is Boohoo, so I offered to make her a coat instead. Unsurprisingly she wasn’t too keen initially – I have form in offering to make something and then taking aaaaaaaaages to get it done. So this time I thought : “challenge accepted!”

While we were still talking on the phone, I was googling suitable patterns and fabrics and sending her links to choose from. The two front runners for pattern were the Fibre Mood Hunter coat and an offering from Viki Sews, the Martina Coat. The Martina won because it was less structured and had a less formal look. I know there are people who, in the current climate with Ukraine, wouldn’t buy a pattern from a Russian company and I did have my doubts, but there was no other pattern she found to be as suitable. We got the pattern on sale on the company’s Etsy store, so at least I can say the Russian government isn’t getting very much in tax income from this one pattern!

The pattern called for 3.3m of fabric for her size, which is the 36-3. The 3 indicates height. Daughter no 2 ordered the exact amount of black viscose “wool” from a large online fabric company (who I don’t usually buy from) and it was on the button! I had black on black paisley lining in my stash, as well as black cotton pocketing, so all I still needed to source were snaps. These I got in a little haberdashery in London.

As I was up against the clock with this, I didn’t toile. I had asked her to check the finished length of the coat and the sleeve length when purchasing the pattern, but because it has so much ease I wasn’t too concerned with “perfect fit”. This coat doesn’t have the amount of interfacing and structure I’m used to putting into an overgarment. It relies a lot on the use of Vilene bias tape, which I was lucky enough to have a little stash of.

The instructions for the Viki Sews patterns are comprehensive and sit alongside photographs of each step. I really like how they did the back vent, you get a fabulous finish with their instructions. I only deviated when it came to the lining – I don’t like bagging coats and jackets, so handstitched the hem of the coat and sleeves in place before hand stitching the lining to it.

The fabric was really nice to work with, given that it wasn’t real wool! We ordered a sample of it before purchasing, the website describes it as medium to heavyweight, but I’d say it’s more medium than heavy. It was perfect for this project though, a heavier fabric wouldn’t look as good and I feel that for the £12.99/m price tag, we did well. The black colour is nice and deep and it’s really soft. It pressed well and stayed put when I wanted it to. This was helpful for making the welt pocket! Daughter no 2 is happy with the pockets especially, they’re deep enough to hold a phone comfortably and not let anything fall out when you sit down.

Once the fabric and pattern had arrived and were prepped, it didn’t take me long to make this coat, just three days once it was cut out. I was happy to get it done quickly and she was equally happy to get it that fast! She’s worn it pretty much every day since getting it (hand delivered in the first half of February), so that’s good to know!

Blue Chinos

After making the blue spotty Olya Shirt, I decided to use up a piece of navy twill chino fabric I’d got from Croft Mill recently to make another pair of trousers. I’m still on the barrel-leg/ coccoon shape drive, and I fancied a pattern from a Burda magazine that I liked when I saw it ages ago. The panels on the trouser front looked interesting, as did the dart in the hem of the back piece. They are 106 from February 2020. Those panels offer an opportunity, perhaps, to play with stripes or uses variety of fabrics, or to do something a bit fun and different. But not this time.

I traced the 42 & 44, grading out in the waist area for my non-existant waist! I added 1cm to each side seam, and that’s done the job. The crotch depth was shortened by 2cm and I took a 1.5cm wedge out of the back depth too. The leg length was fine once I’d shortened the crotch depth! The legs were still rather baggy for me, I know they’re supposed to be, but too baggy pants just make me look short. So I’m staying with the overall look, just not quite as baggy! From the hip line, I took them in to the 42. This looks much better to me, still had the shape, but not big. And they don’t make me look too short! It’s got to be a win.

I didn’t use the welt pockets as designed, I was concerned that this fabric might go shiny or fade, so I opted for inseam pockets instead. They’re attached to the wasitband at the top so that they don’t flap around like the Style Arc Teddy pants. I used a scrap of African Wax for the pocket bags to cut down on bulk, so there’s a little pop of pattern. As it’s a Burda pattern, the fly zip was a breeze!

These are really comfortable to wear, althought now I’ve worn them a few times I think I’ll be taking them in a little more at the waist. I think another centimetre will do the trick. I definitely will make another pair, but first I have other trouser patterns that I’ve seen and liked the look of. I need to give them all a chance!

I love the colour and the crisp handle of the fabric, it feels perfect for the utility trouser/chino trousers look that seems to be doing the rounds at the moment. It presses well and even after a full day of wearing, isn’t as creased as I’d expect for crisp cotton. However, it has faded a bit. I’ve worn these trousers about once a week since making them at the end of January, and the fabric is not as dark as the left over bits stashed in my scraps box. I think a linen pair would do rather nicely, but for now, I hope that these will be worn loads in the spring/summer/autumn!

Work in Progress 2/23

I had intended to post this yesterday, but couldn’t get access to my computer and realised that the new Jet Pack upgrade to the phone app doesn’t allow you to create a new post from your phone! I am excited about this project, I think I’ve made the perfect combination of fabric and pattern! The pattern is one I’ve used before, jacket 111 from the August 2021 issue of Burda. I love wearing the black jacket I made before and thought that a lighter weight version would be lovely for spring/summer.

When I made the black jacket, I altered the pattern by adding depth for a Full Bust Adjustment. I had also already altered the collar and front to allow for turn of cloth, I made this allowance slightly narrower because my fabric is less bulky than the last time. I lost the allowance on the front because I wanted to change the look of the front. While the double-breasted design is fine, this time I wanted it as a single. I measured out from the centre front, a 1.5cm buttonstand and added seam allowance and a bit more for turn of cloth, making the same adjustments on the front facing (except the turn of cloth extra!). The pockets also needed work – the original ones were a pain to sew the hem up around, and I always find them too far back, even though they’re in the side seams. I faffed around for a while with placement, etc, but ended up leaving the pockets off all together.

Collar underside detail

So, let’s show you my workings so far. I had already decided not to add too much structure. This jacket has no shoulder pads, so the interfacing, while being in all the important places, is only the lightweight stuff. Gill Arnold is no longer trading, so I bought this batch from The English Couture Company.

I loved the piping detail on the magazine version but it would have been totally obscured with the fabric I used on my first version, so this was my chance! I use a bit of left-over blue cotton twill chino fabric for the piping, but didn’t add piping cord, so it’s just a small flap. I cut 3.5cm bias strips and folded them in half. With the standard 1.5cm seam allowance, the strip sticking out is just 2-3mm, which does the job for me just perfectly. With this fabric, I love the strip of dark blue!

Let’s talk fabric – I bought it from Stitch Fabrics, aka Rosenberg and Sons in the autumn last year at the Quilting show at the NEC. I can’t find it on their website, so I assume it’s out of stock now. It’s the most beautiful jacquard, with a denim coloured ground and an overlaid print of white flowers and leaves. I loved it the minute I saw it on the stand and knew it would be a jacket.

I just love the way the sleeves have turned out with the piping! I made a sleeve facing for the hem, the curve is just too great to allow for an ordinarily turned-up hem. It is so much neater and will allow for the lining hem to sit nicely too. The extra allowed in the upper collar for turn of cloth has resulted in a very nice finish there too, I am happy with the way it’s all going so far! I’ve ordered lining from Croft Mill Fabrics, something bright and yummy!! I didn’t want blue or white on the inside of this gorgeous jacket, so went looking for an orange/paprika/rusty shade. Croft Mill had just what I wanted and I can’t wait for it to arrive! All I still need to do is decide on buttons. Will I have enough in the stash?

Stay tuned for the finished project, hopefully it won’t be too long!!

I Want More

The big sleeve – I wonder when it’s not going to be something we all love to wear? I sincerely hope that never happens, because I love me a big sleeve! The blouse attached to this particular big sleeve is one I’ve made before, 114 from the January issue of Burda, 2016. The last time I made it I used a piece of precious silk from my stash, and I’ve loved wearing that blouse! I decided it was time to make another, a slightly more “everyday” version.

The fabric is viscose, on off-white ground with a 3mm wide black stripe running parallel to the grain. Like all viscoses, it’s soft and fluid and has great drape. I got it from Croft Mill back in January in their sale section, and they have just 2 metres left of it! It pre-washed with no hitches and it irons really nicely. For the cutting out, I pinned loads of the stripes to each other, because – like viscose does – it moves!! Pinning worked, and I managed to get it all cut with the minimum of blue air. I changed the layout just a little, the front is supposed to be cut as two and seamed down the centre with an opening at the neck. I cut it on the fold and made an opening bound with a bias continuous placket instead.

That was the only adjustment to the pattern made this time. I had already made an FBA when I made the pattern back in 2018 and I stuck with that. French seams keep all the insides neat and tidy and I double rolled the hem. The neck and sleeves are bound with bias strips and I love the angle of the stripe in those areas. The back yoke is just one layer, with the lower back gently gathered into the centre of the yoke. I like this small amount of gathering because it isn’t too full.

Then there’s the sleeve…. I love this sleeve! It’s cut cleverly so the the opening isn’t parallel to the floor. The top sleeve area is shorter than the under-sleeve, giving a fuller effect when you wear it. Can I just walk around fluttering my sleeves everywhere I go? This is a fabulous addition to my wardrobe, I felt I had a gap for a lighter coloured blouse, and now that’s filled! It’ll be lovely to wear more when the weather warms up!

Olya Shirt

Another Olya – oh yes!!! This is one of my absolute favourite patterns at the moment, and making it in a lightweight cotton is the best!! The fabric is from Stitch Fabrics, aka Rosenberg and Son. I happened to “spot” it in a story on Instagram and knew I had to have some! A quick hunt through their website netted me 2m in double quick time and I couldn’t wait for it to arrive! It’s really lovely, soft and drapey, but with a certain amout of crispness which is really nice. Unfortunately, it’s no longer on their website, I looked! It has an ivory ground and brilliant blue blobby spots, the colours just sing.

Slightly smug in my new shirt!

I made the straight size 14 again. My measurements put me in a bigger size, but I am really happpy with the amount of ease in the 14. I’m pretty sure the bigger size would just feel like wearing a tent! There’s only so much “oversized” that I’m happy with. That’s the nice thing about the patterns with loads of ease, you get to choose just how much of that ease you’re comfortable with! The only thing I changed was to alter the placket opening to a simple continuous bias instead. This is just for speed, I really wanted to get this shirt made in time to wear to visit Daughter No1 in London. I had a little scare when it was button choosing time – I was three short! Why does this always happen? A drawer full of buttons, and I don’t have enough. Anway, I thankfully found those three when digging through another box! Phew!

The shirt looks great with my new Worker Trousers and I’m sure, will look fab with the linen trousers in the summer boxes currently languishing in the loft. Roll on summer!

My Sanctuary Garden

My little piece of heaven on earth

Making and Books

I like making, and I like books.

The Insouciant Stitcher

Creativity beats Insanity

Fabric Engineering

Creating a well-fitting wardrobe, piece by piece

Yet Another Unfinished Project

Crafting better mental health by sewing myself happy. Slow fashion, conscious consuming and an effort to live a more ethical life.

A Tailored View

The thinking behind a project

Poundcake

a lot of cake and a little frosting

Sew Everything Blog

Always sewing. Sewing Everything. Sharing the Sewing with Everyone

Your Stitches May Vary

sewing, making, and mental health.

The Easy Blues

craft, diy, natural dyeing

Creating in the Gap

Forever sewing

Love, Lucie

Where hands and minds are rarely still

U&Mii

Adventures of a plus size renegade seamstress

allsewpetite

Create beautiful bags with confidence!

tales of the sewing city

slow sewing, creativity, and a fabric obsession

Mainelymenswear

Be your own luxury brand !

Marsha Style

PDF sewing patterns & sewing blog

Buttons and Trims

Sewing - Learning - Making

Designed By Danita

"Seams" like I've been sewing forever!

the curious kiwi

Happily immersed in sewing nerdyness…

KJ Sews

Sewing and more

nelnanandnora

Faith, family and creativity

Sew My Style

Forever sewing

Offsquare

A refashion and sewing blog

Tailored by Kate

My sewing record

The Notions Tin

Forever sewing

Girls in the Garden

Forever sewing

The Savvy Sartorialist

Fashion, Lifestyle & Travel by Trish O'Sullivan

Needleswift

Sewing lessons in Lindfield, West Sussex

Just another blog

Permanently sleep deprived. Trying to make a lot of stuff.

jess sews clothes

blogging my homemade wardrobe

nomadiccharacter

Forever sewing

The German Edge

Forever sewing

Make&Wear - sewing-knitting-making

An Irish sewing, knitting and making Blog