So it’s January Again

Well that went quickly, didn’t it? I suppose it helps when I’m not posting regularly, and last year was a bit “messy” with everything going on! I really am still sewing, albeit not as much, but I am not finding it easy, or fun, to take photos. However – as it is January, it’s as good a place as any to try to start again and post again. I do miss reading blogs, my reader isn’t anywhere near as full as it used to be.

So, being January, it’s time for Sew japanese in January, Jungle January and a whole host of other sewing challenges to kick start your Sewjo after the Christmas crush. Sew Japanese in January is hosted by Blogless Anna on Instagram, and it’s a great way to use Japanese patterns and or fabrics. The fabric I chose is viscose, soft and drapy, off white with a pale blue print that almost resembles layers of palm leaves over each other.

After last year’s over shopping and under sewing achievements, I have decided to shop from my collection of patterns and fabrics as much as possible this year. I got the fabric last year from Stitch Fabrics at the Sewing show at the NEC. I’m not banning myself from buying anything, because I know my level of willpower! But I really need to get the levels of fabric in the sewing cupboard under control.

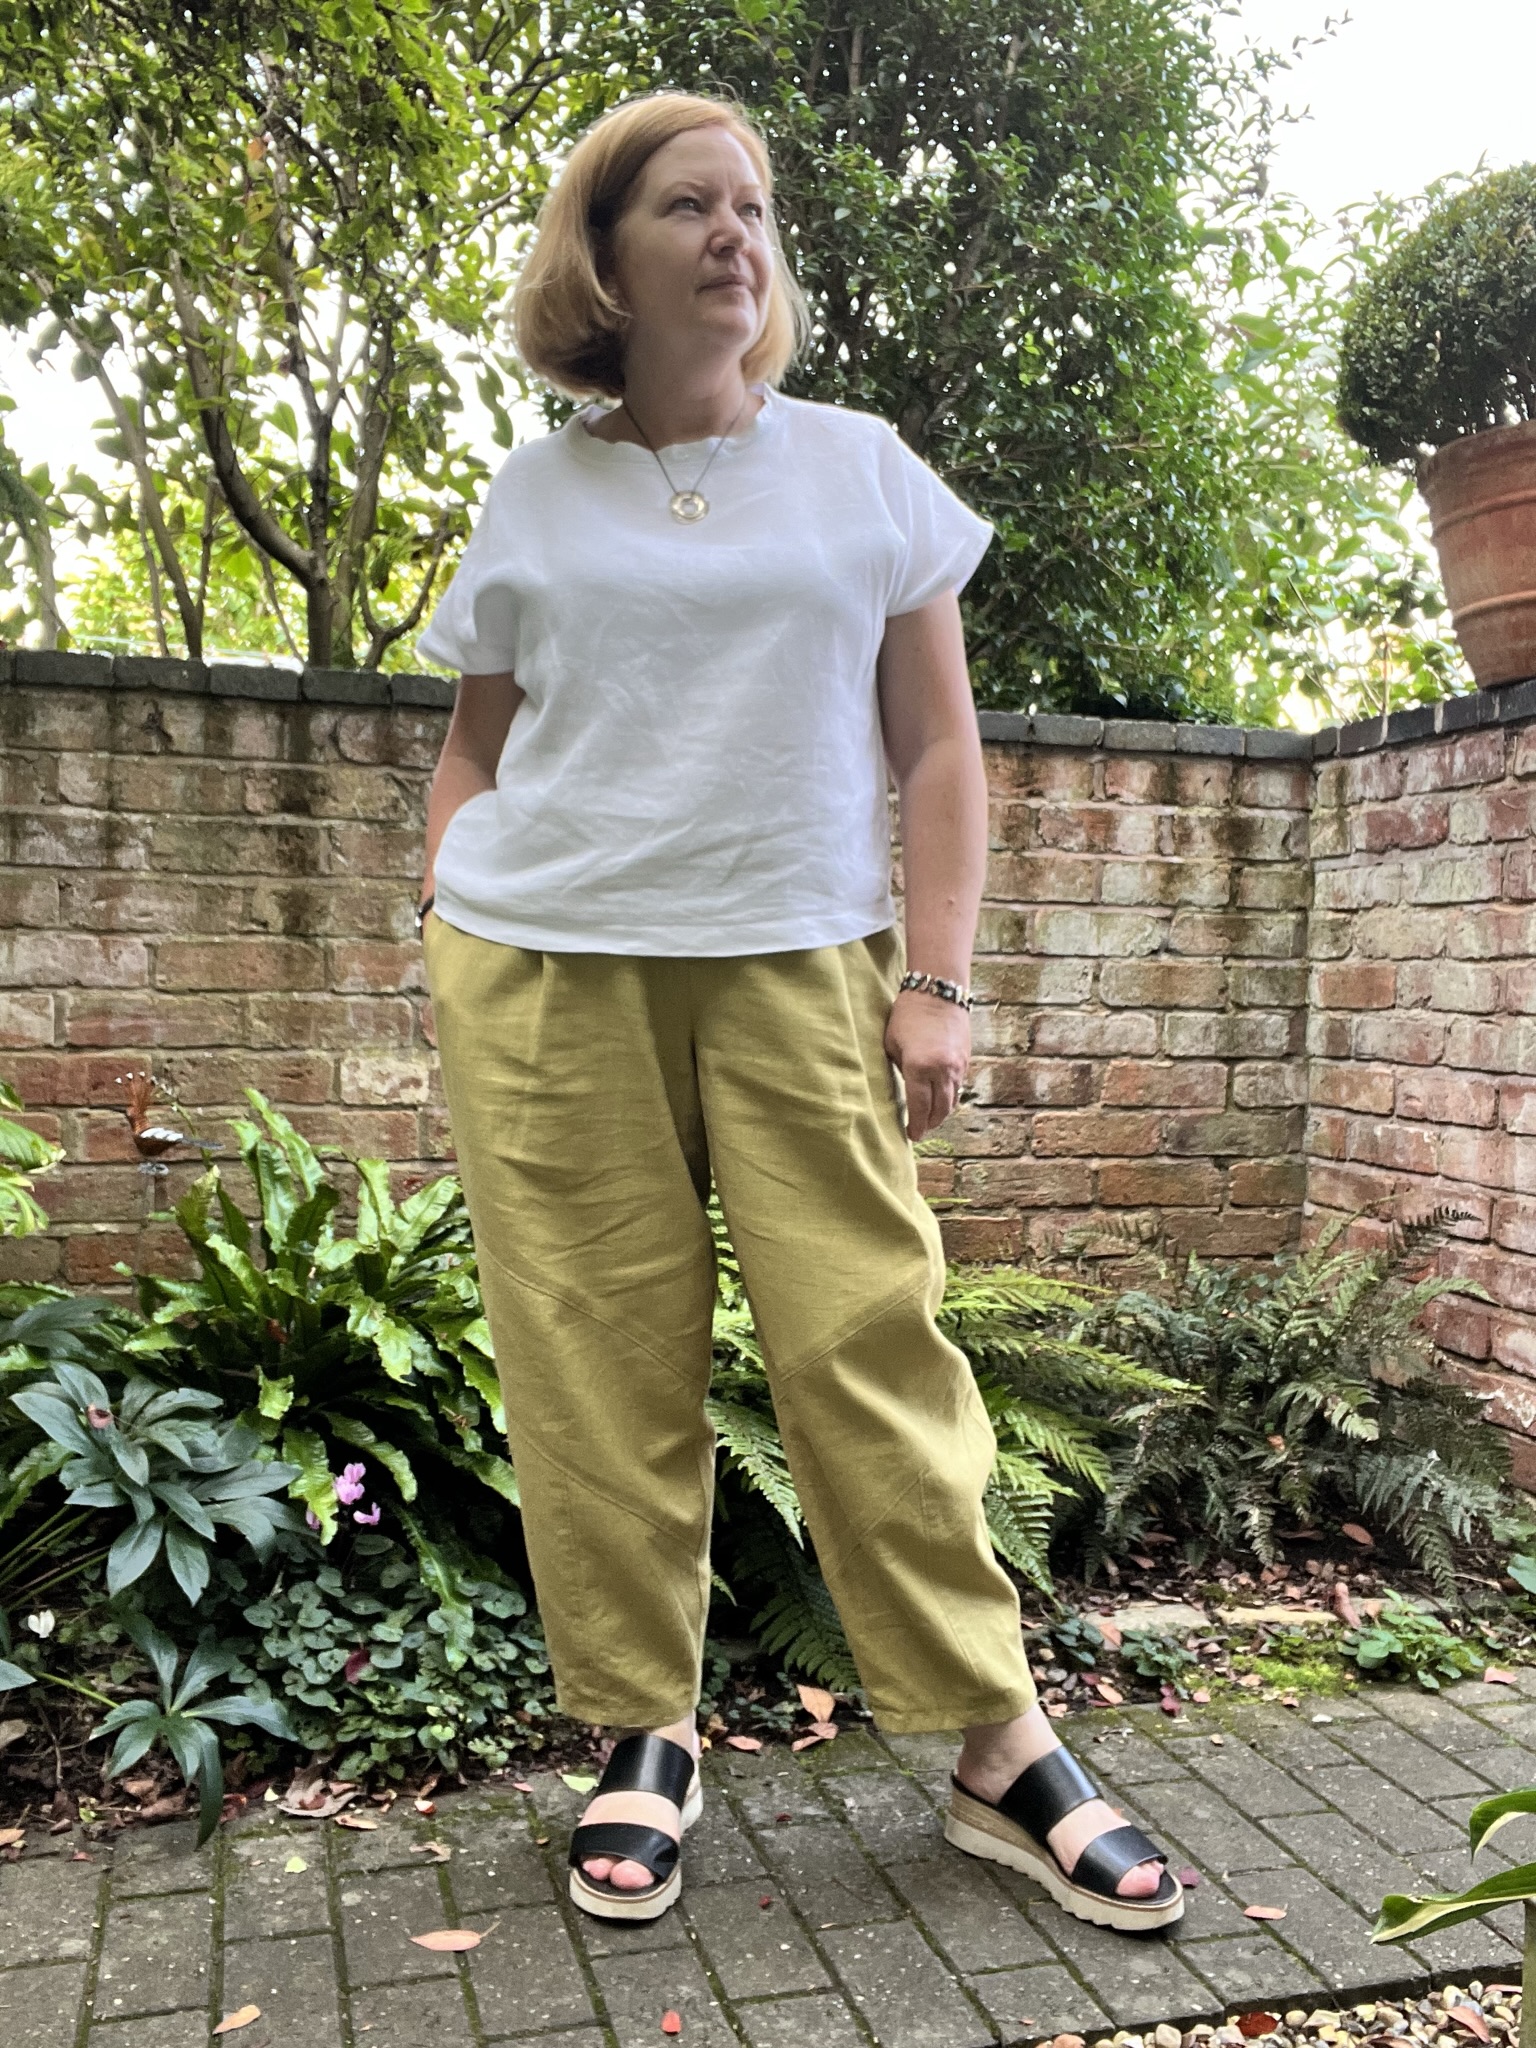
I have to confess that I’ve been a bit lazy with my contribution for Sew Japanese this year, I’m not making anything outrageous or using a new pattern. I simply reached for my favourite blouse from Asuka Hamada’s book, Sweet Clothes, and whipped up a beautiful top with big sleeves that I know I will love to wear all year long! Tick for using an existing pattern and fabric from the cupboard!

I’ve made no adjustments to the pattern since last January when I made this gorgeous blue windowpane version. The insides are all pretty with French seams throughout and the viscose behaved itself while I applied the self bias to the neck edge. Initially I thought I’d be wearing this with a contrasting, dark pair of trousers/jeans, but I popped it on with the off-white corduroy Betty Pants I made last January and I really like the pale look!

Further plans for a Japanese January are afoot. I had a length of vintage Japanese cotton fabric given to me in ’22, and I’d love to make a yukata with it. I bought a Folkwear Kimono pattern from Higgs and Higgs last summer, but I’m also intrigued by Emilia’s posts on Kimono making. The printed pattern is not the same as the layout they describe, so I’m on the fence a bit. I only have one bolt of the fabric and I need to do it justice and make it correctly! I guess you’ll have to come back and watch this space to see what I actually do – if anything….

Jumping on the Wide Leg Trousers Trend

Finally, the rest of the fashion world has realised what I knew years ago – wide leg trousers/pants are simply fabulous! Daughter No 2 has been wanting a pair of those fabulously floppy, soft, wide legged trousers for a while now, and we’ve gone through loads of pattern options, but none were quite right. I thought I’d cracked it with the Landers, but no, not quite.

Protea pants in cotton twill

This summer I bought the Protea Pants pattern from Paradise Patterns as part of their fundraiser for the Hawaiian fire disaster. I’d fancied it for myself for a while, but not all photos on Instagram were ticking the boxes, so there was some doubt. Anyway, I offered this pattern to Ms Fussy Pants, and she graciously allowed me to toile it for her. She has a lovely piece of worsted wool suiting in navy that is begging to become a pair of wide legged trousers.

In Seam pockets

I toiled the pleat-free version, having traced both the size 2 and 4, but for the toile went for the size 4 without adjustments, and the 32″ leg length. Her measurements put her in the 4 for waist and 2 for hips, which is completely opposite to how patterns usually work for her. I usually have to grade out for the hips. So I was a bit wary. However – they fit perfectly! I was gobsmacked – I’ve never had a pattern fit her straight out of the envelope. All I did differently was to turn up just 3cm of the 4-5cm hem. The pants just skim above the floor when she’s wearing her converses.

So – at this point I’m happy, I can cut the wool and get started. Except the words I was dreading, but had expected, drifted across the sewing room. “Muuum – can you make these wearable…..?” Accompanied with the usual puppy dog eyes. I bloody knew it! But I’d sewn with white thread. She wasn’t bothered, so I kept going, doing all the visible stitching with the white too! Of course this means I had to pull the seams apart at various sections in order to neaten the seams, insert the pockets and retro-fit the zip and belt loops.

The pants actually look fantastic, and she’s worn them already! Good news is that they were comfy all day, didn’t drop in the waist and the pockets are a decent size for her phone and other paraphanalia. And she definitely wants those wool trousers now! So I suppose that’s this week’s job.

The instructions are good, but I ignored most of them, especially the zip installation. I have my own method that works just fine and is nice and quick and neat. I stuck the fly facing piece to the front at the relevant point in order to eliminate that extra seam and faff too, just cut off what you don’t need afterwards with the overlocker.

Of course, I haven’t traced them in my size at all yet…

Better Late Than Never

Waaaay back in May of this year, a week break in Cornwall resulted in the inevitable trip to Truro Fabrics – with the obvious result. Daughter No 2 was with me and bought three pieces for herself. One piece was a 1cm black and white gingham cotton that she wanted to make a skirt from, a tiered, gathered skirt like the ones she’s been seeing on Instagram. I knew we could make a pattern easily enough, and that it would also be easy enough for her to make on her own, with limited time.

About two months later I finally made enough of a pattern for the fitted top section of the skirt to enable a toile for fitting and adjusting purposes. Notes were made. Last weekend Daughter No 2 came to visit for 5 days. Take a flying guess at what was on the top on her list of things to do while she was home…! We made a new pattern from the notes made in July, toiled and made new notes, adjusted the pattern and decided on the proportions for the tiered, gathered parts of the skirt. We had to work with the piece we had, no more was available to purchase.

Daughter No 2 made the fitted part of the skirt, and inserted the invisible zip, while I measured and cut the long rectangles for the rest. The first tier was to be a finished length of 28cm, and we’d use the full width of the fabric. We also decided on narrow, 1cm seams to get the most out. The second tier was to be 35cm deep, one and a half times the width of the fabric. I was thinking to just cut the width twice, but she didn’t want it that gathered. We were able to hide the join quite well in the pattern of the gingham.

All in all, she did a fabulous job on this skirt, and maybe she’ll make another next summer! I have saved the pattern pieces and the sizes of the rectangles needed for the tiers. I’m sorry I hadn’t got myself organised sooner as she’d have loved wearing this skirt this summer, but it’s done and now it’s an autumn skirt instead! I love it with the tights and Docs.

Olya the Seventh – I Think

When a pattern is perfect, it is only right to make it again and again, right? I’ve made so many versions of my favourite Burda trousers, a certain Burda jacket and some of the Style Arc pants – and this shirt. I have other patterns. But I do love this one! Mr Not-Compulsive thinks I need to branch out, try other shirts too, but I’m still all starry eyed over the Olya.

So here she is, I think this is the seventh one I’ve made now. I love the print of the fabric, it’s also a nice weight, so perfect for winter wearing. Some of the others are a little thin – necessitating a jumper if they’re to be worn when it’s chilly, and boy, are we going down that route fast now!! It’s hard to believe that just a month ago we were in the middle of a mini heatwave! (Please note, I started writing this post at the beginning of October!)

So here we are now, a month down the line and definitely in cooler temperatures. I love this shirt, it looks great with jeans and my rust coloured winter trousers, so I know it’ll be worn loads over the winter. But hubby is right – I do need to branch out. I’ve been working my way through a number of FibreMood magazines that I’ve bought, tracing out the interesting looking blouses, so hopefully I’ll find the time to toile some of those and make them up in some of the gorgeous fabrics I have in my stash!

Work in Progress Wednesday 2/23

Oh I have been remiss – this is only the second peek into my sewing process I’ve done this year! It has been a weird one, to be hoonest, so we’ll just move on, shall we? Today I’m making another Olya shirt. Another?? Well, yes. I love this pattern! Its simultaneously casual and smart, all depends on how you wear it. The fabric is viscose, but no one of those thin, floaty viscoses. This one has more body and weight, less floaty drape than you’d expect from viscose, so I think it’ll be perfect for cooler weather wearing. And yes, I think we can now safely say that it is moving properly into cooler weather!

This is one of the pieces I dug out of the stash after my last post, so maybe I am also acutally making pogress with “planned” Autumn sewing!! I bought it from Rainbow Fabric at their stand at the Festival of Quilts in August, knowing that it would be a shirt, but not sure at the time whether it would be an Olya or The Assembly Line’s Oversized Shirt. That one I’ve yet to toile. But I know the Olya pretty well now and I’m after a bit off quick sewing gratification!

So let’s get started, shall we? The instructions have you starting with the placket, but I usually get the back made up first, makes me feel like I’m already getting somewhere. Then it’s the placket, because you can’t do anything else until that’s sorted. I make a slight change to the placket, sewing it from the outside instead of the inside, as per the instructions. This is because I like the clean lines of a machine stitch and fold, rather than pressing a fold and topstitching. The look overall of the placket remains the same, I just prefer my finish.

With the pleats folded, ironed, and pinned in place and the placket done, the front yoke and sleeve piece can be attached to the main front piece. This is when it all starts to look like you’re getting somewhere! Now the side seams join the fronts to back and you have a rather large, unwieldy bit of fabric! I like that the instructions guide you to finish the seams as you go, with this unusual pattern, it’s good to keep track of that as you can’t always go back and tidy something up later.

Sewing the shoulders is always fun on this shirt, but follow the instructions to the letter and it’s very do-able. I pin the shoulder seams to the corner, then the sleeve into the armhole from the yoke joining seam to the end, leaving the section from the shoulder corner unpinned so I can rotate the fabric after snipping the corner. I find this easier than trying to get it all in place before snipping, or the converse, having all that flapping about when I’m trying to sew!

Sewing the sleeve seam is then a piece of cake, a quick press of the seam and topstitching finishes it all off nicely. This is when I quickly staystitch the neck, sometimes I remember and do it when the pieces are still seperate, but now is as good a time as any! The front bands go on now, after I’ve taken time out to interface them and all the other pieces that need interfacing. I know it should be done at the bgining, but I’m usually too keen on getting started, so I wait until I have to do it.

This is as far as I got today, other things to do! I’ll finish the front band, sewing it on the inside by hand before topstitching from the outside. Again, it’s just a finish I prefer. Then collar, cuffs and hem. I think I have suitable buttons in the stash, otherwise it looks like I may have to pay a visit to the charity shop to see if they have anything useful.

All these bits are ready to be sewn tomorrow, so hopefully I’ll get it all done by lunchtime, then it’s off to do other things.

How Many More Times

Another pair of linen trousers has been added to the summer wardrobe. Back in January I made a pair of Burda trousers using some crisp cotton chino fabric and said at the time that I’d love to make a linen pair – well, I’ve made them! Pants 106 from February 2020 with the interesting seam detail on the front legs and the barrel shape has proved to be a pattern I like very much.

Seam details on the front leg

The linen is from Higgs and Higgs, chartreuse in colour and with some weight and body, it’s not a light linen, so it’s going to be perfect to wear as the weather cools down (not this week, with its 30 deg C offerings!) I think I jinxed the weather with my last post about cool September and thinking of warmer layers! This week, all I’ve wanted is a swimming pool and a lot of shade!

Back to the pattern – I made it with the same adjustments as the last time, but took it in at the waist in the side seams by 1cm each side. The waistband fits better now, so it was the right choice. As the fabric is a little thick and doesn’t have a smooth texture, I decided to cut the inner waistband pieces from a left over piece of Liberty lawn. The colours go together really well and it feels lovely against my skin.

Liberty lawn to line the waistband

There might possibly be another pair in the works for the winter – I have some lovely pieces of wool.

Geometric Zadie

I love the Zadie jumpsuit, it’s so easy to make, and so fabulous to wear! This one almost wasn’t a jumpsuit at all, the fabric was initially destined to be trousers, with possibly making a jacket from the rest of it. But I was hit on the head with a bolt of inspirational lightning. I realised I’d be wearing only blue or off white tops with this fabric if it were trousers – and as a jacket, I’d be wanting plain tops under it, so…. It made perfect sense to make an all-in-one, in effect, a jumpsuit. And we all know the best jumpsuit around is Zadie!

I made a decision to cut the bodice with the pattern running 90 degrees to that on the trouser section – something I now maybe think I shouldn’t have done. It’s fine, and I still love it, but maybe it was not the 100% best decision. No matter, it’s done! Let’s talk fabric. It’s cotton satin with a little bit of stretch across the width, off-white with a dull navy blue print. I bought it from Stitch Fabrics at their stall at the NEC in March, 3m of it!!! There is a bit left for something else, but it was cheap because it had a print fault in it, so cutting needs to be done carefully. I was aware of the fault when I bought it.

I cut the size 16 with FBA adjustment and other alterations that I’d made when I first made the Zadie back in 2019 and went for the short sleeves and cropped trouser length. It’s summer after all, even if the British weather hasn’t had the memo. As always, it’s a super comfortable item of clothing to wear and the cotton has been lovely and cool. Its just got a luxurious feeling to it that makes it feel a milion bucks.

I love it, not much more to say, really!!

Seasonal Changes

September – that time of change, Spring day in the southern hemisphere where it’s celebrated with fresh flowers and the advent of summer school uniform; dreaded in the north as the harbinger of long nights, dull, damp weather. But there’s good in it too, right? Speaking from the north now, September brings crisp mornings, the chance to add a little layer or two, and the innate desire to wrap up. Time spent in the anticipation of a good rifle through the stash to see what new goodies we can make for Autumn and Winter. Not to mention the dreaded Christmas word and vague ideas that we might just manage some handmade Christmas gifts inbetween making gorgeous clothes.

I’m still firmly in the “it can’t be the end of summer yet” camp. Our British weather has been its usual unpredictable self and left us wondering what happened to our summer. I still have piles of linen waiting to be transformed into summer trousers, jersey for tee-shirts and some lightweight cotton for shirts. You could say I should just make them anyway, but given that last year’s summer things didn’t fit this year, I’m not keen on that angle.

So it’s time to re-evaluate the piles on the cutting table and pack away what I won’t be able to make and wear with the changing weather. It’s time to dig out the suiting, the wool and heavier weight jersey – and lovely denim. Maybe turn those summer tees into longer sleeved tops. Planning and preparation – getting lost in the stash for a few happy hours.

For those of you who like a little flutter in a sale, and happen to also have a penchant for vintage patterns, I have a 20% discount running in my Etsy pattern shop for this month. Feel free to help me make more space in my pattern cupboard to fit the extra fabric stash!

See you on the other side, I might actually have some ideas by then!

In the Pink

While my mum was visiting, we actually managed a fair amount of sewing, which you wouldn’t know from the lack on Instagram sewing posts! At some point in the first few weeks of her arrival I needed a certain something out of a fabric box in my stash and had a good hunt for it which, of course, lead to “ooh, you have to see this fabric, and this one, and, isn’t this gorgeous???” One thing leads to another and soon the fabric is strewn all over the room, boxes up-ended and a little gooey pile of fabric heaven sits in the middle. Then I opened the wool box…. I don’t remember what exactly was said in order for that box to be unlocked, but it was. One piece of wool in that box was a simply divine magenta pink wool – exact content unknown. I’d bought it back in the mists of time, around 2005-ish, I think. It was going to be a jacket for one of the girls, but they shied away from the intensity of the colour! Mum took one look and said, “That’s gorgeous, but it wouldn’t work on me.” HAHA! Challenge accepted. So I draped it on her and – wow. I made her look in the mirror and we both knew, this was her fabric! But what would we make….

Well, she needed a warmer jacket than the one she’d brought with her due to May’s weather being damp, dull and depressing. So she borrowed my corduroy Burda jacket. You know where this is heading, don’t you? She decided the magenta wool would be perfect in that jacket, lengthened as I had done for myself in the arms and body. So why, when we’d decided that back in May, did I only just finish in the last week of her 3 month visit? We thought we had plenty of time, I thought I had the magazine in my sewing room in the Burda boxes and so we delayed. But time flies when you’re having fun and the magazine wasn’t in the sewing room, but in the loft!

It was eventually extracated and the pattern traced, I traced the 40, 42 and 44, hedging my bets. I toiled the jacket witht he 40 across the shoulders and upper bust, grading out to the 44 over the hips. 5 cm was added to the length of both sleeves and body pieces. But the toile showed I needed to do a lot of work! As a lady approaching her 8th decade, mum has sloping shoulders, a slightly rounded back, forward hips and a little tummy, not to mention that she’s slightly pear-shaped too. So.

  • Sloping shoulder adjustment of 3cm (!)
  • Narrow the shoulders by 1cm
  • drop the front neckline 1cm
  • rounded back adjustment of 1.5cm
  • add more to the front and back panel seams and the side seams, from the waist to the hips and hem

Retoile and hey presto, it worked! Now I had one week left to make it all. I couldn’t remember how or if I’d prepped the wool when I first bought it, so I shrunk it using the London method, the batik for the lining, which mum chose, was popped into the washing machine. I used a plain coloured viscose twill lining from my lining stash of offcuts and leftovers for the sleeves. This had already been pre-washed. We found buttons from my stash, fabulous vintage ones!

I love the pairing of the magenta shell with the batik cotton lining, it looks like modern stained glass windows, or boiled sweets melted in the oven for using on gingerbread houses! We tried all sorts of patterns and prints and fabrics with that wool, but nothing really clicked until mum saw the batik. I have to confess that I don’t think I’d have chosen it. So I’m glad that’s a really personal touch! (The patch pockets are lined with the batik too!)

Mum loves it! She pranced around all day when I took the photos, and chose to wear it on the plane back home too! She looked so smart and put together! Unfortunately she won’t wear it much more this year, as winter in South Africa is swiftly drawing to a close now, but she’s ready for it next year!

Ink Blue Flowers

I found this gorgeous cotton fabric on the Rosenberg stall at the NEC back in March and fell in love. Initially I had a jacket in mind, but soon decided on a pair of trousers. I just needed to pick a pattern. The fabric is quite crisp, with a decent amount of body and absolutely zero stretch or movement. So I went looking in my older Burda magazines for something that didn’t require a certain percentage of elastane.

I happened to have a little stash of early 2000 and late 90s magazines out of the loft storage, so this is where I started. May 2002 happens to be a very good month! As I saw this pattern in the magazine, I remembered that I’d admired the details the first time I’d seen it, and loved it. The pleated hem and the panel front leg lends itself to a bit of playing with pattern direction.

So I decided, what the hell, this is what I’ll make! It’s only 21 years later…. I traced the 44 and 46, toiled the 46 and made just a few small tweaks to the fit. I shortened the crotch depth and at the knee by 2 cm each, and straightened the top curve shape to adjust for having no waist!

There were two style, or non-fitting adjustments I wanted to make. One big one I had to make was to add pockets. Pants need pockets! I drew on the toile where I thought the pocket would be best placed and made it deep enough for my hand and phone. As the front leg is in two panels, it made sense to use the side panel to construct the pocket. The other adjustment I wanted to make was to change the zipper from opening on the side to a front fly. This means that if I have to make any size adjustments I can do it without first taking an invisible zip out!

I’ve worn these so many times since making them back in June, the pockets work perfectly and I just love the pleated hem detail! They’re really comfortable to wear, which I wasn’t expecting given that the fabric has no movement. I have a feeling I’ll need another pair, possibly in a solid colour so that the panels in the leg pieces and the pleats can stand out better, especially if picked out with a decent topstitching thread. I think I’ll have to trace more patterns from this month, it really is a good one!

My Sanctuary Garden

My little piece of heaven on earth

Making and Books

I like making, and I like books.

The Insouciant Stitcher

Creativity beats Insanity

Fabric Engineering

Creating a well-fitting wardrobe, piece by piece

Yet Another Unfinished Project

Crafting better mental health by sewing myself happy. Slow fashion, conscious consuming and an effort to live a more ethical life.

A Tailored View

The thinking behind a project

Poundcake

a lot of cake and a little frosting

Sew Everything Blog

Always sewing. Sewing Everything. Sharing the Sewing with Everyone

Your Stitches May Vary

sewing, making, and mental health.

The Easy Blues

craft, diy, natural dyeing

Creating in the Gap

Forever sewing

Love, Lucie

Where hands and minds are rarely still

U&Mii

Adventures of a plus size renegade seamstress

allsewpetite

Create beautiful bags with confidence!

tales of the sewing city

slow sewing, creativity, and a fabric obsession

Mainelymenswear

Be your own luxury brand !

Marsha Style

PDF sewing patterns & sewing blog

Buttons and Trims

Sewing - Learning - Making

Designed By Danita

"Seams" like I've been sewing forever!

the curious kiwi

Happily immersed in sewing nerdyness…

KJ Sews

Sewing and more

nelnanandnora

Faith, family and creativity

Sew My Style

Forever sewing

Offsquare

A refashion and sewing blog

Tailored by Kate

My sewing record

The Notions Tin

Forever sewing

Girls in the Garden

Forever sewing

The Savvy Sartorialist

Fashion, Lifestyle & Travel by Trish O'Sullivan

Needleswift

Sewing lessons in Lindfield, West Sussex

Just another blog

Permanently sleep deprived. Trying to make a lot of stuff.

jess sews clothes

blogging my homemade wardrobe

nomadiccharacter

Forever sewing

The German Edge

Forever sewing

Make&Wear - sewing-knitting-making

An Irish sewing, knitting and making Blog